How to Use OneNote for Project Management in 2025: Advanced Project Management Features
OneNote is the all-in-one tool that seamlessly combines note-taking and project management capabilities. Discover how to use OneNote for project management and effortlessly streamline your workflow from start to finish.
Key Takeaways: OneNote Tips & Tricks
- OneNote can be used for project management, allowing you to organize project notes, track and update tasks, and store important project documents, but it’s not ideal for managing complex projects or large teams.
- OneNote offers a lot of useful features, such as preplanned templates, co-authoring that allows users to edit notes simultaneously, and revision history that project managers can use to track changes made on OneNote pages.
- You can integrate OneNote with other Microsoft tools, such as Microsoft Teams, to manage video meetings, document meeting minutes and enhance collaboration within your team.
Microsoft OneNote is undoubtedly a powerful tool for taking notes. Additionally, it can also be used as an effective project management tool. OneNote’s integrations with Microsoft apps, like Teams and Outlook, can help you manage projects and collaborate with remote team members. We’ll show you how to use OneNote for project management.
If you’re already taking notes on the OneNote app and don’t want to switch between tools, using OneNote for project management is definitely a good idea.
However, due to its lack of advanced project management features, OneNote may not be suitable for managing complex projects (read our full OneNote review for more details). If you want a more comprehensive app, check out our list of the best project management tools.
11 Tips on How to Use OneNote for Project Management Easily & Effectively
OneNote offers a variety of features for you to organize project information, manage OneNote meetings, organize tasks, track progress with to-do lists and a lot more. We’ll walk you through each process below.
Avoid Costly Project Management Mistakes – Get Free Tips Today!

- Discover 10 fundamentals of project management
- Understand step-by-step plans for PM execution
- Learn tips to avoid 5 common mistakes by beginners
1. Take Advantage of Templates
OneNote provides pre-planned templates that can be used for various purposes, from organizing meeting notes to brainstorming sessions. This will standardize your note-taking process and save you time.
- Open the Page
Go to the page where you want to apply a template. Click on the “insert” tab on the ribbon and select “page templates.”

- Choose a Template
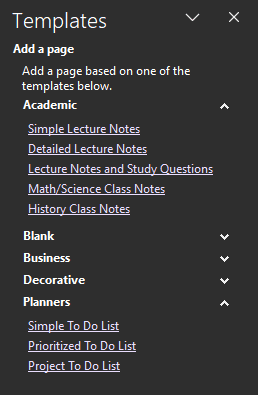
A “templates” pane will appear on the right side of the screen, showing plenty of pre-designed templates grouped by categories. Choose the template that best fits your needs. The template will be applied to your page that doesn’t already contain any notes. (If you want to apply a template to a page that already contains notes, first create a new page from the template you want, and then copy your existing notes into it.)
2. Review Recent Edits and Revisions
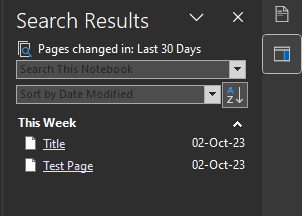
With the OneNote “recent edits” feature, you can view changes and revisions made to your notebook within a certain time period. This is very helpful for a project manager to keep track of progress. The below steps will explain how to use page templates and track changes.
- View Revision History
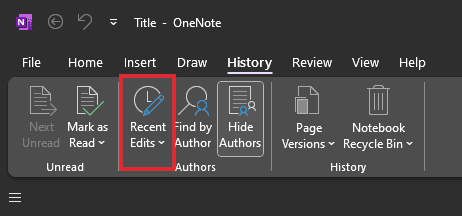
Click on the “history” tab and select “recent edits.”
- Choose a Date Range
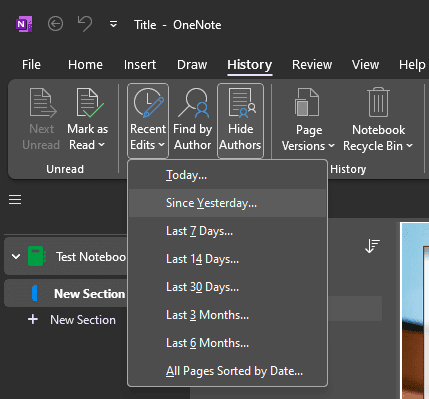
You can choose a specific date range to view the changes made to the page.
- Track the Changes in Search Results
You’ll see the “search results” list on the right side, showing the list of edits made to the page. The changes are also highlighted on the page itself.
3. Collaborate by Sharing a Notebook
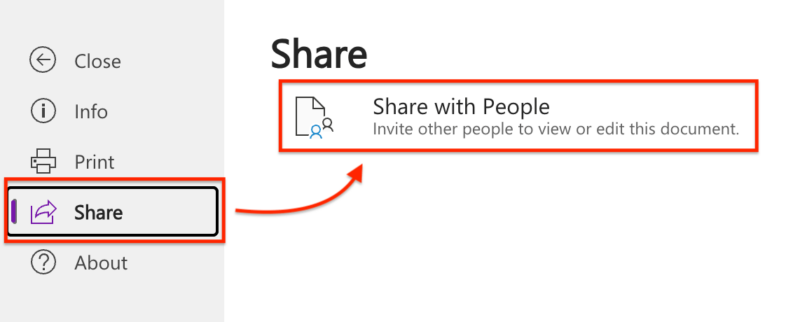
Collaboration on OneNote is easy and efficient. You can share notebooks with team members to view or co-author. The latter option will allow everyone to make changes to the same notebook in real time. Don’t forget what makes OneNote a powerful tool — its integration with Microsoft Teams. This makes it even easier for remote team members to work together.
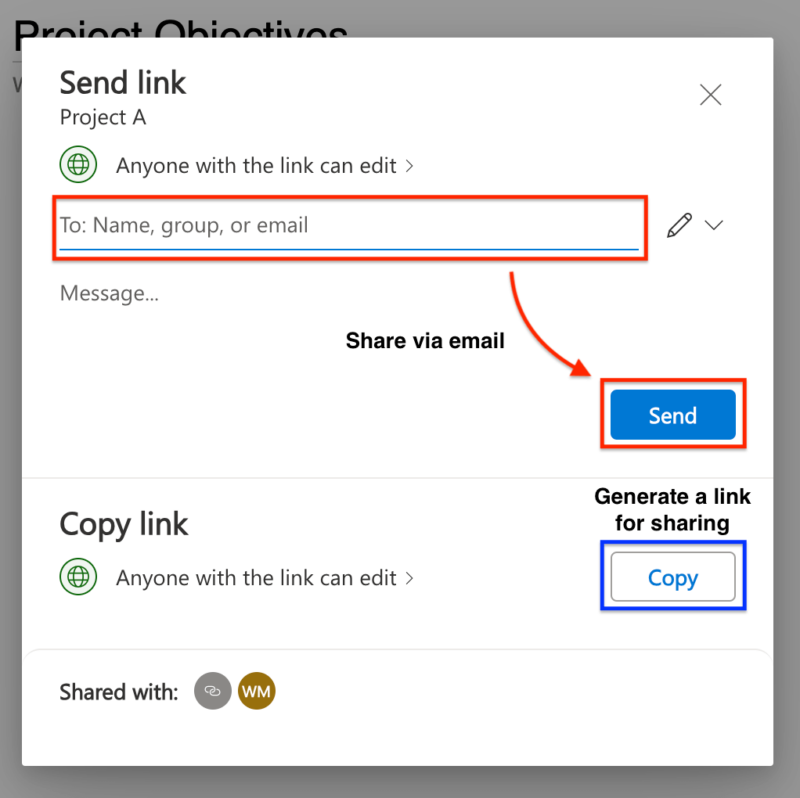
- Select Sharing Options
Choose the method you prefer to share the notebook. If you want to share via email, enter the email addresses of the people you want to share with and click the “send” button. If you prefer to generate a link for sharing, click on the “copy” button.
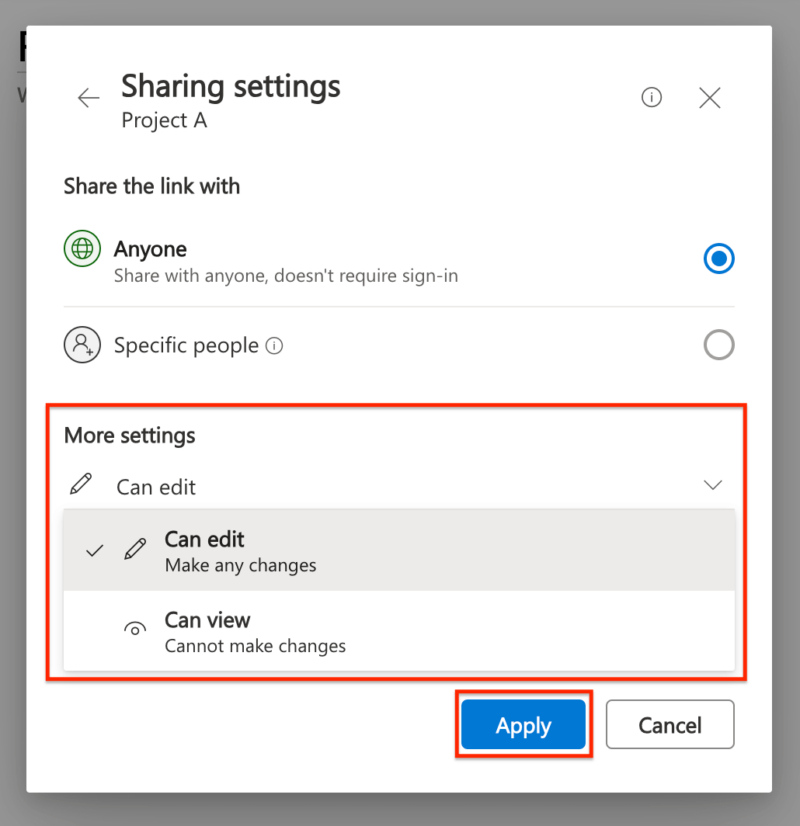
- Set the Permission
Select the permission you want to grant to the recipients, whether to “can view” or “can edit.” Then, click the “apply” button.
4. Set Meetings and Agendas
One of the key features of Microsoft OneNote is its ability to manage meetings and centralize all meeting notes and details. Within your project notebook, you can create a separate section for every project meeting and a new page specifically for each meeting.
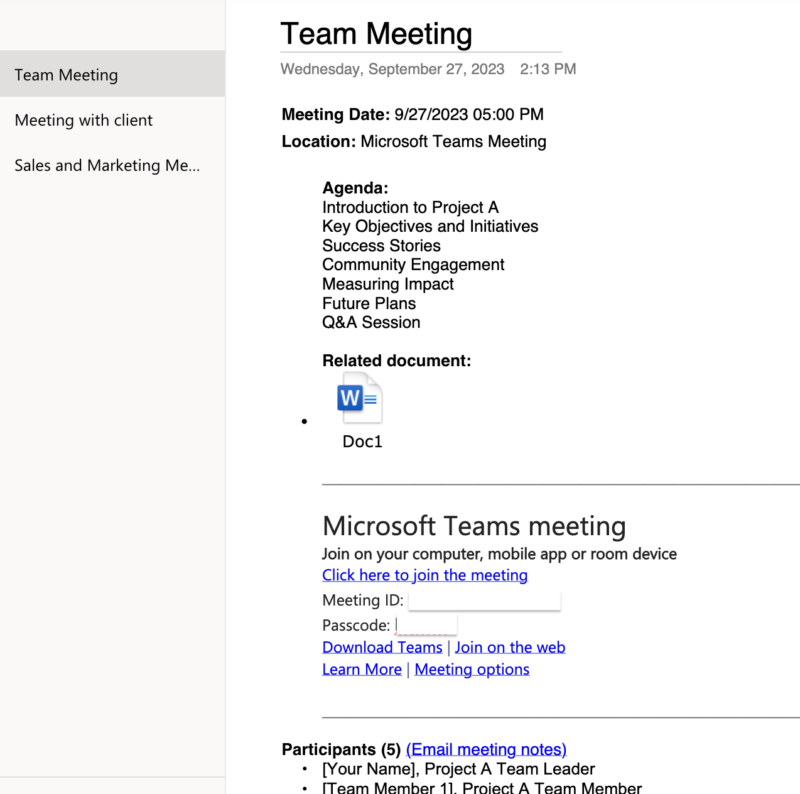
made and store any related file in OneNote.
5. Create To-Do Lists Tasks and Statuses
To use OneNote for project management, you can create checklists to track the progress of any important tasks. Moreover, you don’t have to remember all deadlines on your own. By creating Outlook tasks, you can assign due dates and set reminders for each task. They will also appear in the Outlook calendar.
If you want to keep track of all your tasks’ statuses, you can create a table with columns for statuses in your tasks page. Then, move tasks between the “in progress” and “complete” columns once they are worked on and completed. This to-do list feature will help you stay on top of your projects and make sure that all the necessary tasks are completed on time.
- Write Down Your To-Dos
Open the page that stores your to-do list and start writing down all the tasks you need to complete.

- Create a To-Do List
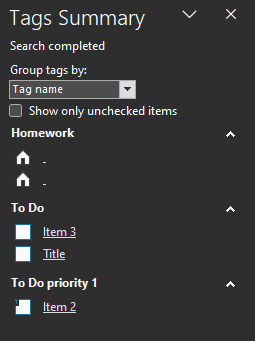
Select the tasks. On the ribbon, click on the “home” tab. In the “tags” group, choose the “to do” option. This will turn your text into a to-do list.

- Find Your Tags
You can find the to-do lists that have been tagged by clicking on the “home” tab and clicking the “find tags” button. The “tag summary” pane will open on the right side of the screen. Choose the tag you want to search for from the list, and it will display the pages that contain that specific tag.
6. Store Lessons Learned and Risks
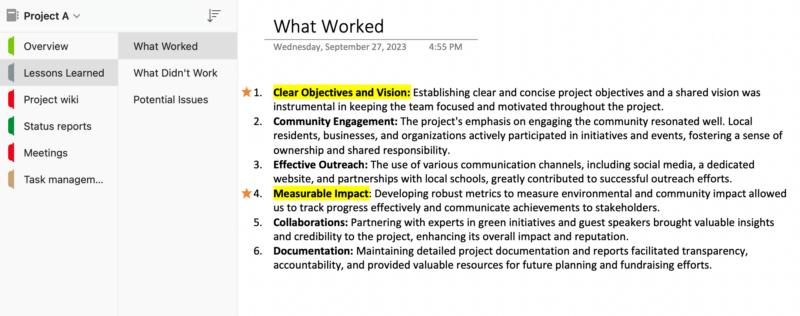
Storing lessons learned and risks throughout a project is a good way to improve project performance and avoid repeating mistakes in the future. You can do this by creating OneNote pages, capturing what worked and what didn’t, gathering stakeholder feedback and keeping track of potential issues or risks that may arise.
7. Link Notebook Sections to a Project Wiki
Every team needs a project wiki. It centralizes key information related to the project and acts as a hub where team members can access and contribute to documentation, updates, and knowledge.
You can make the standard teams wiki connected by linking related pages, sections, or notebooks together. This will even make it easier for team members to find the information they need.
We’ll explain how to link to a relevant notebook section in the project wiki. You can apply the same concept to link relevant project notebooks and pages.
- Copy Link to the Section
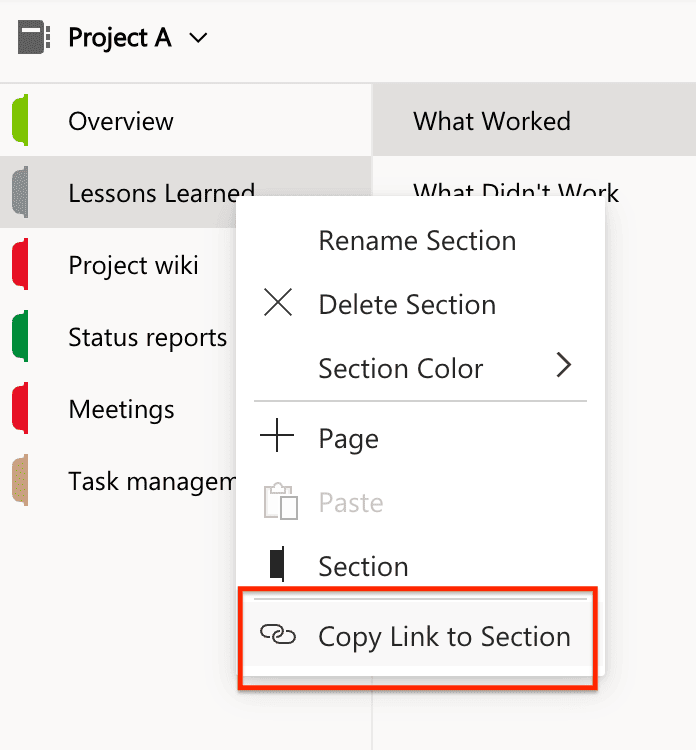
Right-click on the section you want to link and select “copy link to section.” This will copy both the title and link to this section.
- Paste the Link
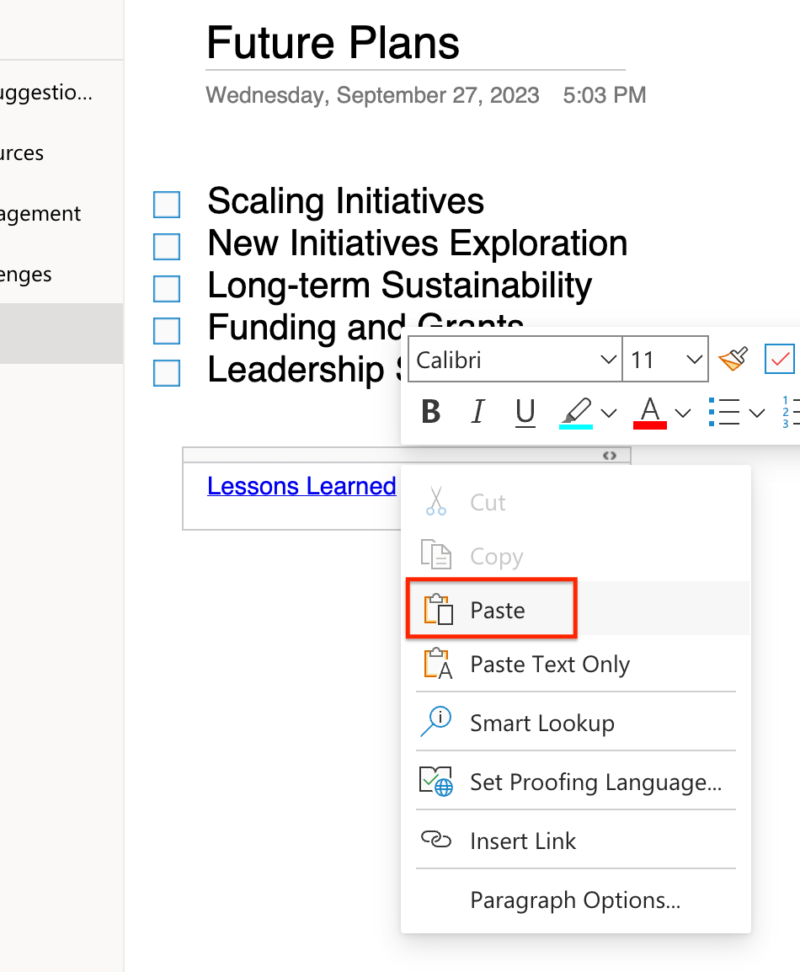
Go to the relevant page. Right-click and select “paste.” A hyperlink will be created with the section title, which will take you directly to the linked section. This can be applied to any notebook or page.
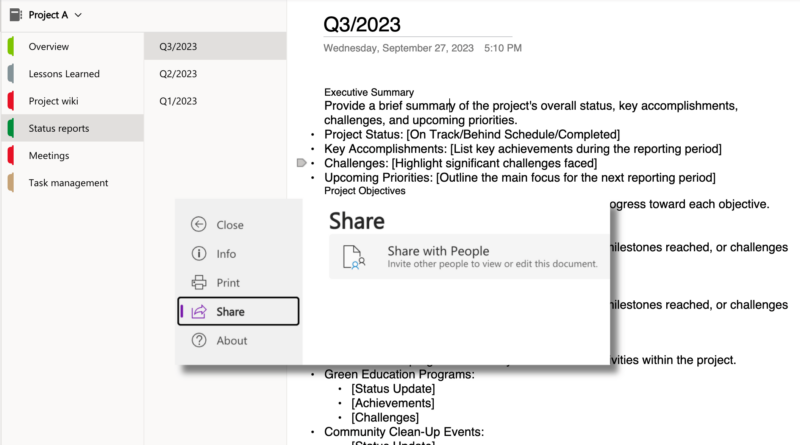
8. Create Status Reports
Status reports provide a clear overview of the project, whether it’s recent updates or accomplishments. With OneNote’s “recent edits” feature, you can track previous changes and easily pull them into a status report. Sharing these reports with teams, management or stakeholders will keep everyone involved up to date and informed about the project’s progress.
9. Password Protect Sensitive Pages
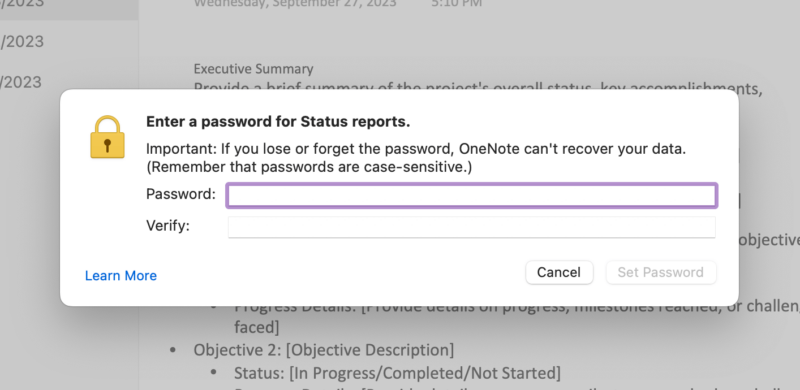
One useful tip for maximizing the security of your sensitive information in OneNote is to password-protect the notebook sections. Setting a password for pages in OneNote allows users to lock a certain section and all the pages inside. However, this feature can be applied to sections only, not specific pages or the entire notebook.
10. Use Tags for Custom Views and Task Tracking
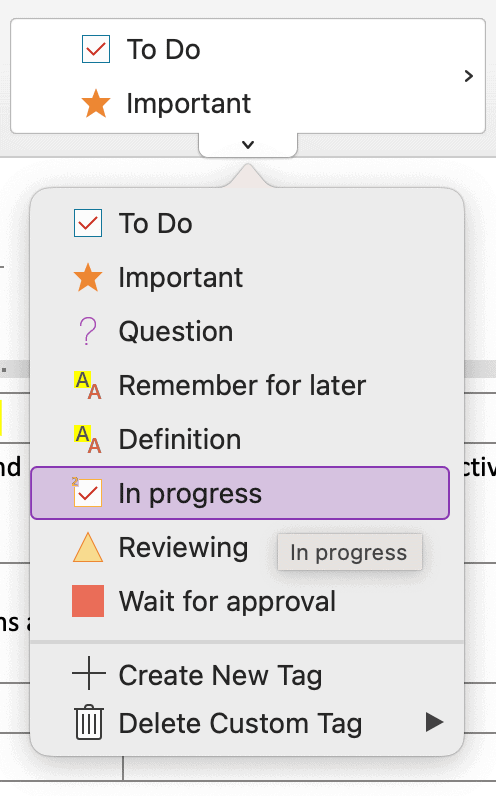
We mentioned “to do” tags earlier. You can also use this feature to effectively track your tasks by creating custom tags, such as “in progress,” and “reviewing.” Then, apply these tags to your tasks in OneNote. When you search for a specific tag, you’ll be able to see all the tasks that have been tagged, making it easier to track progress and prioritize your work.
11. Automate With “Power Automate”
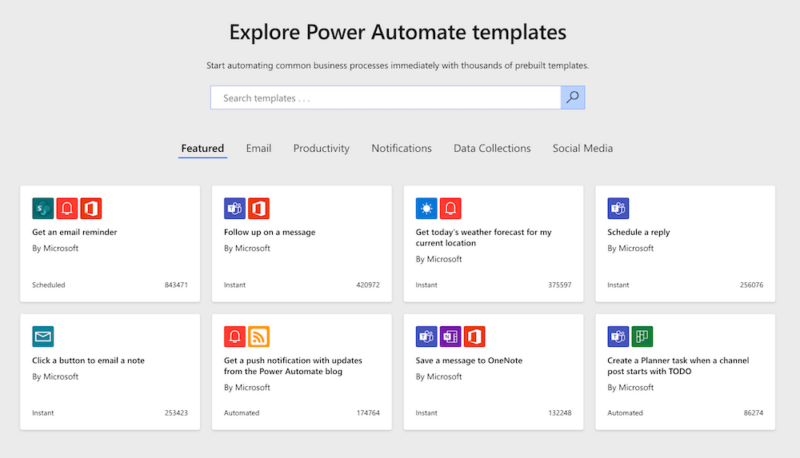
Microsoft Power Automate can be used to automate repetitive tasks to save time and increase productivity. It is the no-code solution that allows you to automate workflows that automatically trigger an action based on a certain condition. For example, set up a workflow that will send you an email reminder when a task is due.
If you’re interested in Power Automate, check out Microsoft’s automation examples to learn more about how to create workflows.
Final Thoughts
Microsoft OneNote is versatile software that goes beyond simple note-taking. It can be used for project management, whether to manage meeting notes, organize tasks or collaborate with team members. While OneNote is a very useful tool, its lack of some advanced features, such as Gantt charts and timelines, makes it unfit for managing complex projects or large teams.
Now, we would love to hear from you. Have you ever used OneNote for project management? What features do you find most helpful? How does it compare to other project management tools you’ve used? Share with us below. Thank you very much for reading.
FAQ: OneNote for Project Management
Yes, OneNote has many useful features for project management. Notebooks, sections and pages can be used to centralize and organize all project-related information. Sharing functionality also allows everyone to collaboratively edit the project notebook in real time.
Start by creating a new OneNote notebook for your planner. Then, add sections and pages as many as you want for each month, week or day. OneNote comes with several preformatted planner templates that can be applied to your pages.
To efficiently structure OneNote, create a separate notebook for each purpose. For example, you could make one for work projects and one for personal use. Within each notebook, create easy-to-consume sections for different aspects, then add and organize pages for tasks or topics. Using tags in your notes is also a great way to categorize and keep your space organized.
When you create a new channel in Microsoft Teams, you’ll automatically see the “notes” tab at the top. This tab connects with your team’s existing OneNote notebook, and each channel refers to each section in OneNote. Team members can create new pages to share information and ideas and work together simultaneously.


