How to Free Up Disk Space – Using Online Storage to Clear Space on Your Local Hard Drive in 2025
Hard drive space is a precious resource, especially on laptops that don’t have many expansion options. Luckily, there are a few easy ways to free up space. Read on to learn how to clear disk space with cloud storage.
When buying a computer, you might consider how much storage it has. However, between system and program files you can’t delete, junk files that build up over time and personal data, you’ll still run out eventually. If that’s happened to you, learning how to free up disk space with cloud storage can save you from the unfortunate fate of having to delete your precious data.
Although we’ll be focusing on using cloud storage in this article, you can also choose to use an external drive to get more room on your computer. This will usually give you faster transfer speeds — especially with a solid state drive — but you’ll also have to consider the failure rate of physical media and the chance it’ll get damaged in a fire or flood.
We’ll also go through ways to save space without moving files at all, by getting rid of old system data, temporary internet files and other files that have stuck around on your PC. You can also delete duplicate files or old program files to save space, but this manual process takes time and the data you can delete is very subjective.
-
08/26/2021
Cloudwards.com updated this article to expand its scope and provide more ways to clear disk space.
How to Clear Disk Space on Windows 10 & 11: First Steps
Obviously, the quickest way to free up some space is by deleting files, but this would normally result in deleting data that you otherwise want to keep. Luckily, if you only need to free up a few gigabytes, you can make use of two programs that come with Windows to help users save space.
The first tool is Disk Cleanup, which lets you delete certain unnecessary files — most notably old Windows update files — which can reach several gigabytes fairly quickly. The other option is the “delete temporary files” option in Windows settings, which will also clear up some old files you probably don’t need anymore.
Use Disk Cleanup to Delete System Files
Running Disk Cleanup lets you remove certain temporary and cached files that can otherwise stick around. Normally this wouldn’t save much space, but there’s also an option to delete system files. You can’t accidentally delete anything important this way, but it will let you get rid of files and logs from previous Windows installations or updates to free up space.
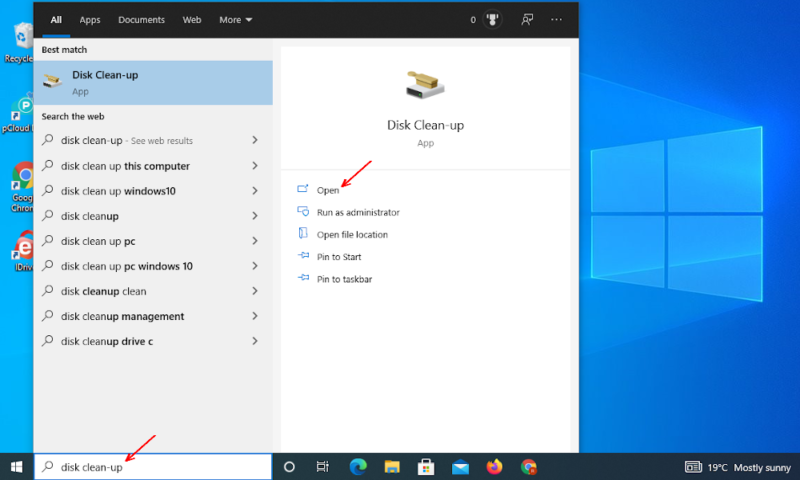
- Open the Disk Cleanup App
In the Windows search box, type “disk cleanup” and open the app that appears.
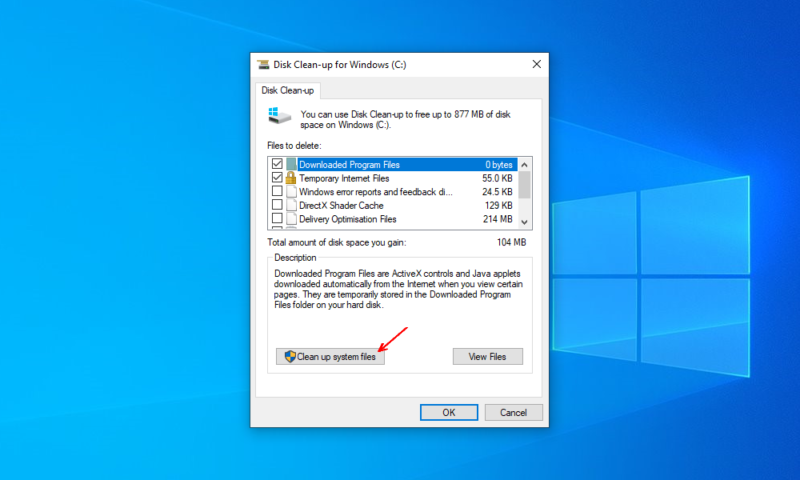
- Add System Files to the Clean Up
Click on the “clean up system files” button to get the option to delete old Windows update and Microsoft Defender files.
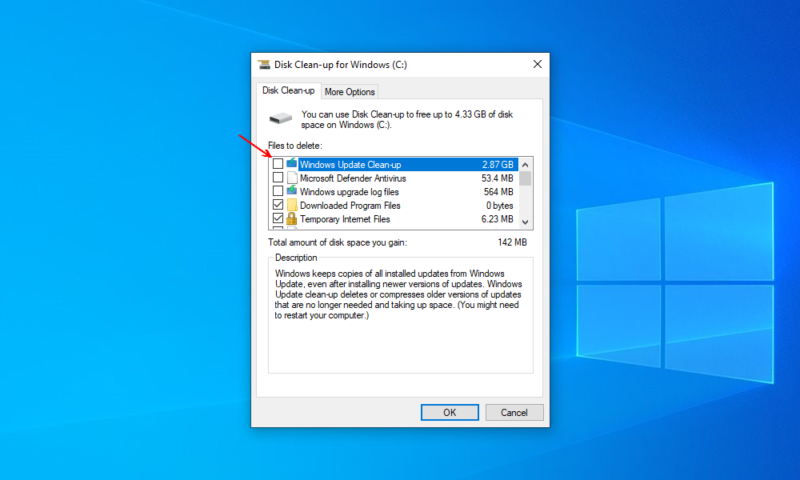
- Select What You Want to Delete
Make sure that the check box next to each file you want to delete is selected. The “Windows update clean-up” files are likely to save the most storage space, but all the options can help if you don’t need those files.
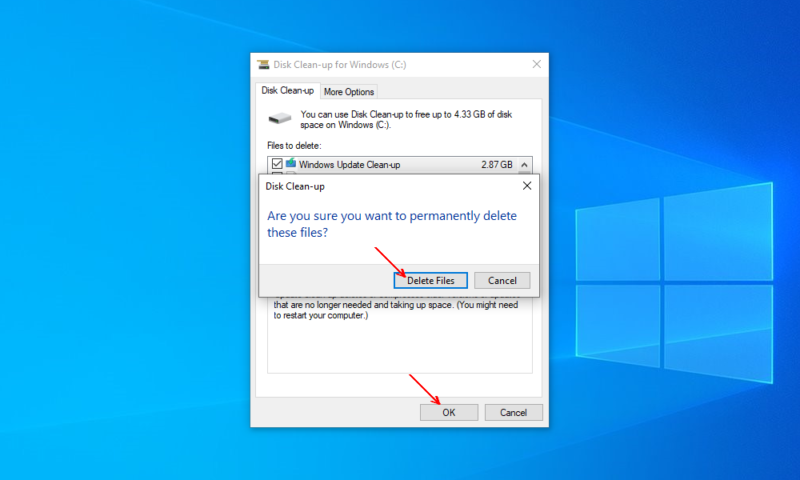
- Delete the Files
Click “OK” in the bottom-right corner of the window to delete these files from your computer.
Delete Temporary Files
In the storage tab of the Windows settings app, you can find out how much space is taken up by different categories of data. One of these categories is the temporary files on your computer, and the app will let you free up space by deleting this data. This is how you do it.
- Open the “Delete Temporary Files” Window
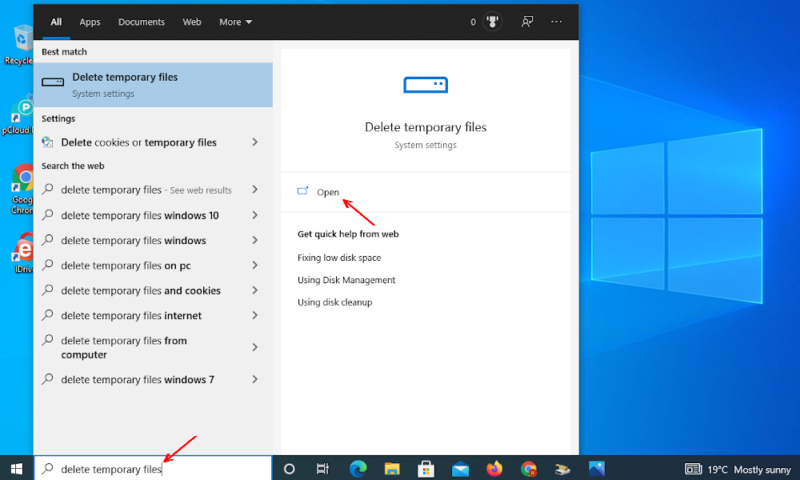
In the Windows search box, type “delete temporary files” and click “open” to bring up the “storage” page in the Windows 10 settings app.
- Select the Temporary Files
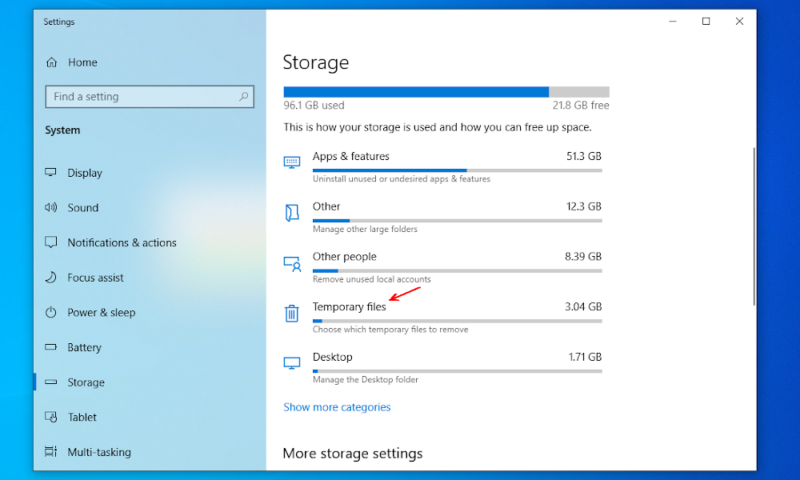
In the “storage” window that opens, click on “temporary files.”
- Select the Categories You Want to Delete
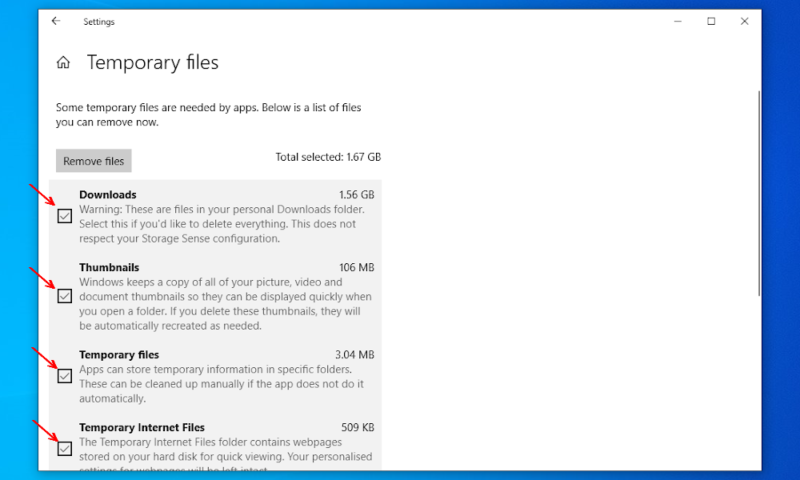
In the temporary files page, select which types of files you want to delete. If you select “downloads,” make sure there isn’t anything in your downloads folder that you might want to keep, as this will erase it all.
- Remove the Files
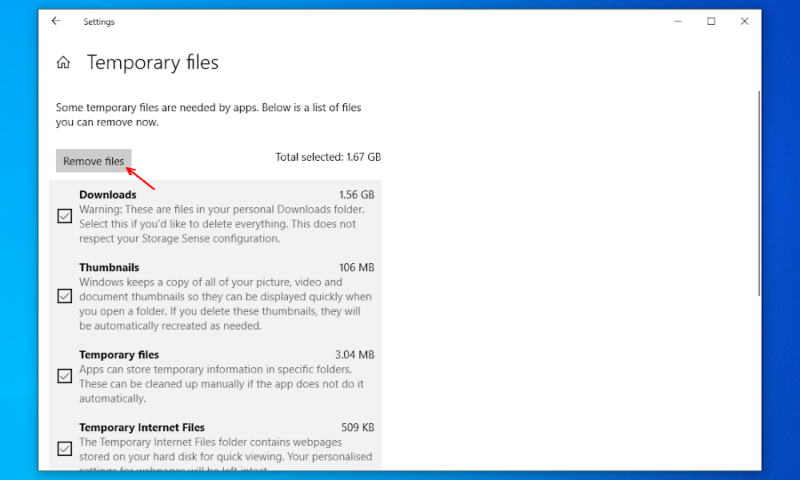
Select “remove files” to delete everything you’ve selected. This will free up some space, but whatever you delete will be gone forever.
Although these are the best steps for maximizing disk space, you may want to check out additional tips by Microsoft for an added boost.
Best Cloud Storage to Free up Disk Space
If clearing temporary data hasn’t given you enough space and there’s nothing else you want to get rid of, then you should look to cloud storage. We’ll go through how to use these services to get more space on your computer later on in this article, but the first thing you need to do is work out what service you want to use.
If you have time, you should look through our list of the best cloud storage providers. However, the brief version is that for storing data on the cheap without sacrificing security, Sync.com, pCloud and Icedrive are good places to start.
1. Sync.com – Best Overall Cloud Storage to Free Up Disk Space
More details about Sync.com:
- Pricing: 5GB free, $4.80 per month for 2TB when billed annually
- Provider website: Sync.com
Pros:
- Great value
- Zero-knowledge encryption
- Easy to use
Cons:
- Small free plan
- Slower than other services
If you’re looking for somewhere secure to put your data, Sync.com is one of the best options out there, and you can read our full Sync.com review to see why we like it so much. At just $4.80 per month for 2TB of storage, it’s easily one of the best deals in cloud storage, especially if you include the free end-to-end encryption for all files and file types.
Not only does Sync.com provide excellent value for the money and top our list of the most secure cloud storage services, but it’s also relatively easy to use, thanks to a clean UI. Ultimately, unless you really need to upload those files as fast as possible, Sync.com is probably your best choice. Even then, you can always pair a fast external drive with Sync.com if you need extra speed.
- 5GB
- 2TB
More plans
- 6TB
- Price includes 3 users
- 1TB
- Monthly price for 1 user (3 users minimum) Yearly price for 3 users
- Unlimited GB
- Minimum 100 users, custom requirements, account manager, training options
2. pCloud – Fast Cloud Storage for Freeing Up Disk Space
More details about pCloud:
- Pricing: 10GB free, $9.99 per month for 2TB when billed annually
- Provider website: pCloud.com
Pros:
- 10GB free plan
- Good value
- Fast transfer speeds
Cons:
- Zero-knowledge encryption costs extra
- Limited document integration
pCloud is arguably Sync.com’s biggest rival, offering a larger 10GB free plan and 2TB for just $9.99 per month. There are many more benefits as well, which we go over in our full pCloud review. However, you can only store data in the pCloud Crypto folder — pCloud’s zero-knowledge encryption offer — if you pay an extra $3.99 per month.
Although this lack of free end-to-end encryption is enough for us to demote it to second place, its faster speeds might matter more to you. As uploads to pCloud don’t have to deal with the extra overhead that comes from encryption, it manages to beat out Sync.com in terms of speed — as you can read about in our Sync.com vs pCloud comparison. With all of these amazing features, it is no wonder that pCloud is one of the best online backup services out there.
- 10GB
- 500GB
- 2TB
More plans
- + FREE Encryption
- 2TB
- + FREE Encryption
- 10TB
- Price per user (minimum 3)
- 1TB
- Price per user (minimum 3)
- 2TB
- Encryption for pCloud Drive
3. Icedrive – Affordable Cloud Storage for Clearing Disk Space

More details about Icedrive:
- Pricing: 10GB free, $4.99 per month for 1TB when billed annually
- Provider website: Icedrive.net
Pros:
- Great value
- Smaller, low-cost plans
Cons:
- Lacks some sharing features
- No free zero-knowledge encryption
As a cloud storage service, Icedrive lacks some of the features that come with other providers, and that’s where it fell behind in our Icedrive vs Sync.com comparison. However, if you’re just storing additional files that don’t fit on your hard drive, you probably don’t need sharing features and tools that help you collaborate with other users.
Instead, Icedrive offers zero-knowledge encryption with all paid plans and the option of a 100GB plan for just $2.99 per month (two-year plan) — giving it high marks in our full Icedrive review. This will usually create enough free space to do what you want without breaking the bank, but there’s also a 1TB plan for $4.99 per month if you find you need more.
- Bandwidth limit: 50GB
- 10GB
- Bandwidth limit: 250GB
- 100GB
- Bandwidth limit: 2TB
- 1TB
More plans
- Bandwidth limit: 8TB
- 3TB
- 512GB
- 2TB
- 10TB
- Additional 128GB storage for users who purchased the Lifetime Plan
- 128GB
- Additional 512GB storage for users who purchased the Lifetime Plan
- 512GB
- Additional 2TB storage for users who purchased the Lifetime Plan
- 2TB
How to Free up Disk Space With Cloud Storage
Since it’s our top choice, we’ll be using Sync.com to hold our data. These steps will show how to upload your files to the cloud and then prevent the Sync.com folder from syncing them back to the computer. Afterwards, you’ll be able to access the files through Sync.com’s website or by turning syncing back on in the sync preferences.
- Create a Folder for the Files
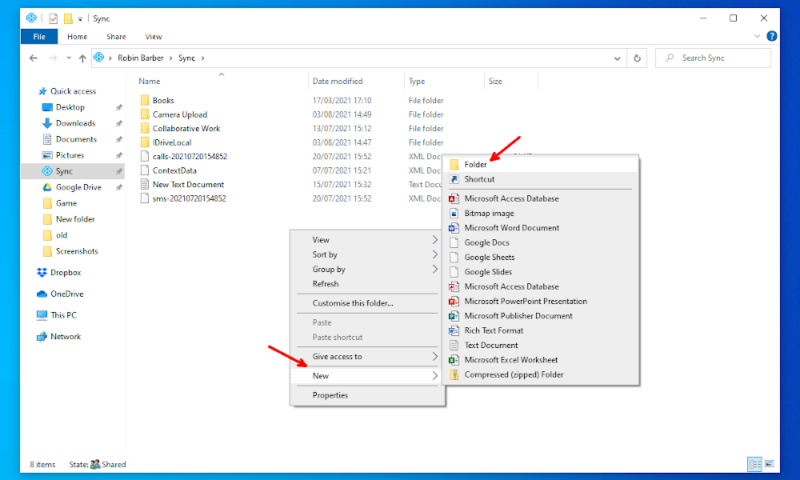
Open File Explorer and find the Sync.com folder. Right-click anywhere on this page, select “new” and then “folder.” Name this folder something obvious, like “unsynced.”
- Find the Files You Want to Move
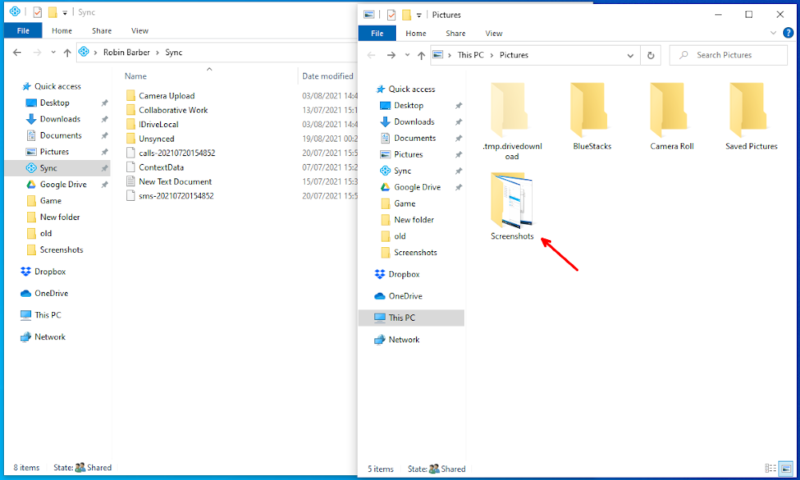
Open a second File Explorer window and find the files you want to move over. Remember that anything that depends on these files may stop working, so check that it isn’t anything important before you continue.
- Copy the Files to the Cloud
Drag and drop the files you want to move into the folder you made earlier. If you don’t have the space to copy these files, you should instead cut and paste them into this folder, then skip step four.
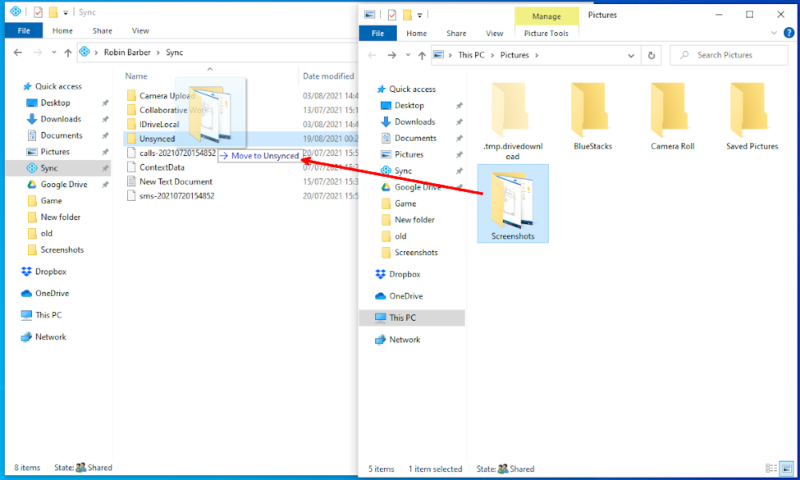
- Delete the Local Copy
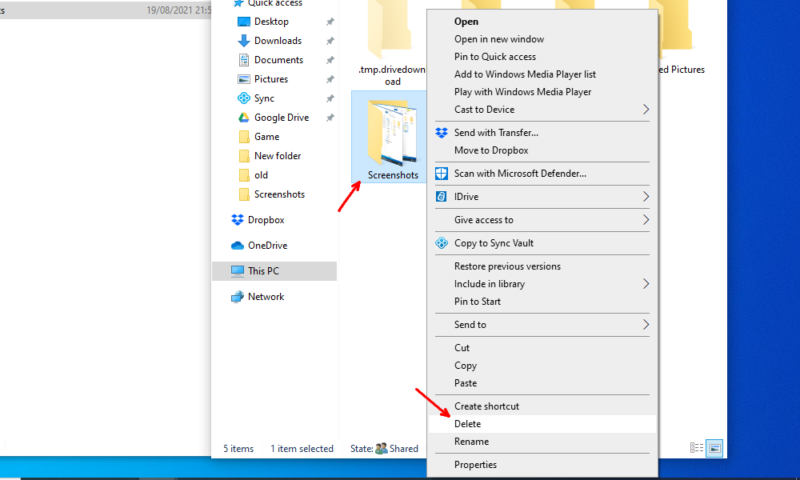
Once you’ve copied the files over and everything has finished uploading — you can check this on Sync.com’s website — delete the original version. You might also need to delete it from the recycle bin afterwards.
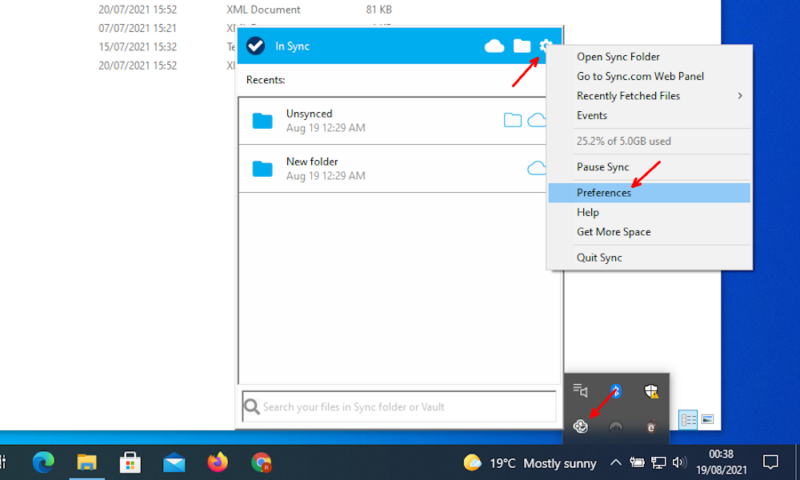
- Open Your Sync.com Preferences
Click on the Sync.com symbol in the system tray, which you can find in the bottom-right corner of your screen. Click the gear icon in the upper-right corner, then select “preferences” from the list.
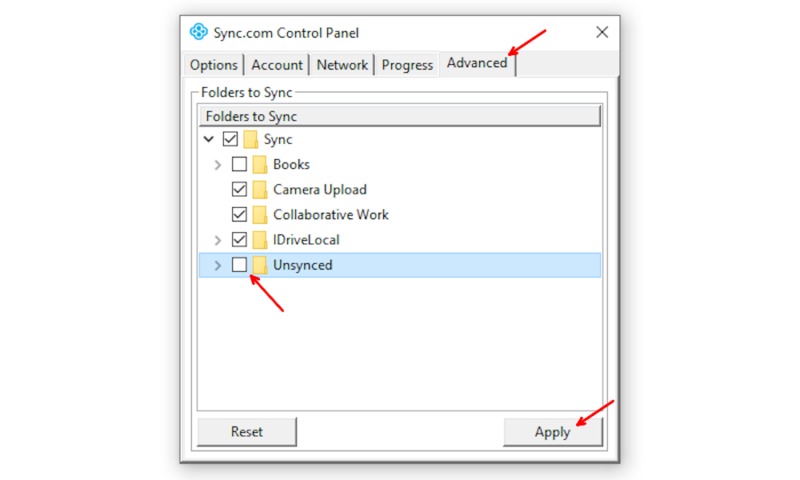
- Stop Syncing the New Folder
Uncheck the box next to the new folder you made, then click “apply” and close the window.
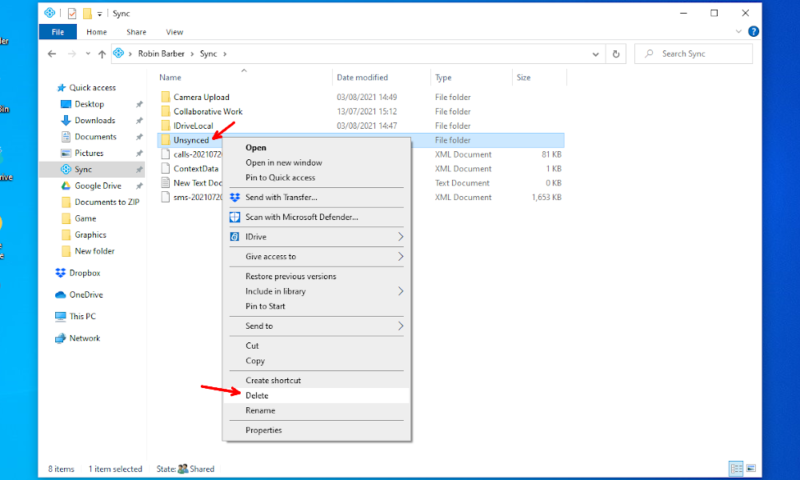
- Delete the Local Copy in Your Sync Folder
Now that the new folder is no longer syncing, you’ll need to manually delete it from your computer to save any space. This will not remove the folder from the Sync.com servers, and you can re-enable syncing for this folder to bring it back by checking the box in the “preferences” window.
Final Thoughts
It can be pretty easy to download and save files without realizing you’re running out of space. However, just because you don’t have an external storage device handy shouldn’t stop you from moving these files off your computer and freeing up some storage for that new app, game or large media folder.
Since you’ll be entrusting the storage service with important files, and probably paying for a year to get a good deal, make sure you test it out first. Most providers have a free cloud storage plan that offers between 5GB and 10GB of space, with the option to upgrade from the free version once you fill your storage. Our top recommendation is Sync.com, which comes with 5GB free.
Have you run out of hard drive space in the past? Did you upload your data to the cloud? Did our methods help you? Let us know your thoughts in the comments below. Thanks for reading.
FAQ
The only way to fix full disk space issues is by deleting files. You can do this by removing unnecessary or duplicate files, or by moving important files onto another storage device, such as a cloud storage account.
Windows 10 includes two tools for freeing up disk space — Disk Cleanup and the “delete temporary files” option in the storage settings. These both work by removing files you probably don’t need, but that your computer has kept just in case something goes wrong or to speed up your computer when doing common tasks.


