How to Backup Photos on Mac in 2025: iCloud vs External HDD
Losing irreplaceable photos can turn a bad situation into a disaster if your Mac happens to die. This article gives step-by-step instructions on how to backup photos on Mac using an external hard drive, your iCloud photo library, Google Drive or dedicated backup software.
Backups have always been the best way to protect data because no matter how careful you are, hard drives do fail. Having multiple copies of your files — ideally, following the 3-2-1 backup rule — means that you can recover your files from data corruption or physical damage. However, to do that for your pictures, you’ll need to read on and learn how to backup photos on Mac.
Key Takeaways:
- Creating a backup is the best way to keep your photos safe.
- Moving your pictures over to an external drive is a quick way to back them up.
- Cloud storage services like iCloud or Google Drive are another great option for photo backups.
- There are also online backup providers for a full system backup.
In 2011, Apple created iCloud, a cloud storage service preinstalled on any Apple device, including each Mac, iPad and iPhone. Combined with the ability to backup files on an external hard drive — either with Time Machine or by just copying your files across — you can have a solid backup solution for your photo library with no third-party software.
However, if you’re fine with installing third-party apps, cloud storage providers like Google Drive and online backup services like Backblaze can be better options. These can be particularly helpful if you’re also looking to sync files across Android, Windows and macOS devices or if you need any of the extra features these options provide.
How to Backup Mac Photos to an External Hard Drive
Whether you prefer the faster data transfer speeds or just want full control over your files, external hard drives are a great choice. Luckily, Apple makes backing up files to an external drive a quick, three-step process.
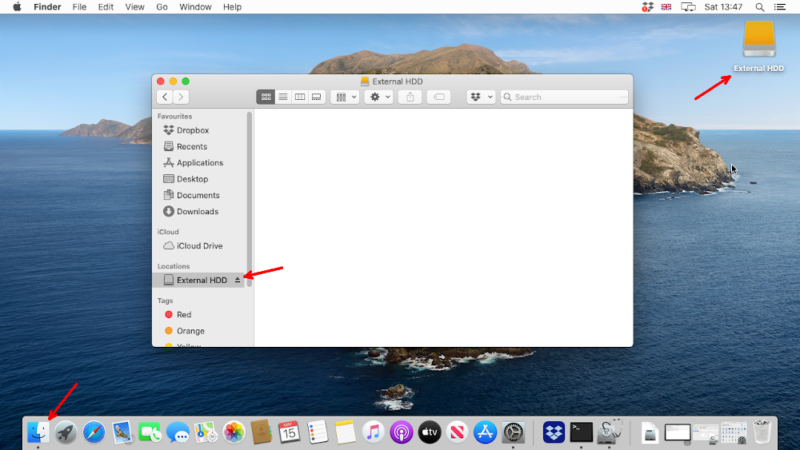
- Open Your External Drive
Plug your external drive into your Mac via USB and open it either from the desktop icon or from within the finder window.
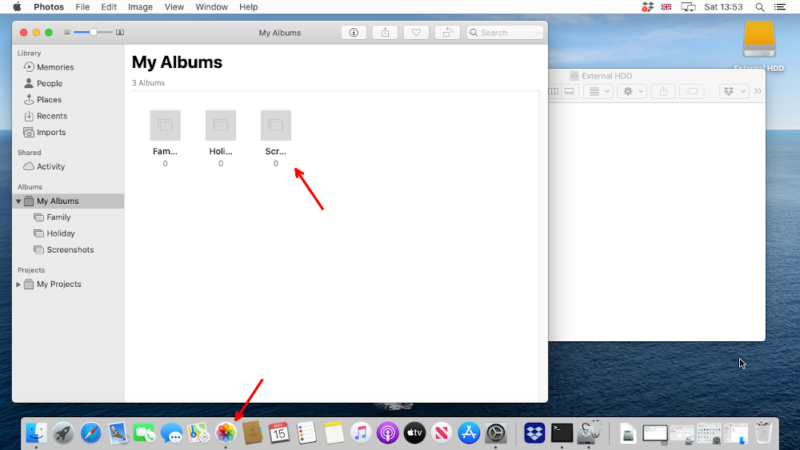
- Open Photos and Find Your Images
Open the “photos” app and find the pictures or albums that you want to backup.
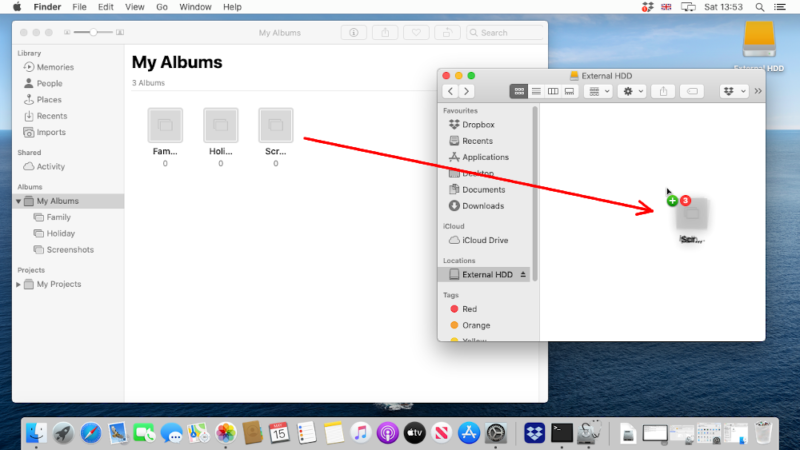
- Drag and Drop the Files Across
Select all of your photos and drag them into your external drive. Make sure it finishes moving everything across before you eject and disconnect the drive.
How to Backup Mac Photos to Your iCloud Photo Library
If you’re looking to save and share photos between multiple Apple devices, then iCloud is the way to go — you can read our full iCloud Drive review here. Simply sign in to your account and make sure that you enable photos in the preferences, then it will automatically backup any pictures into your iCloud photo library.
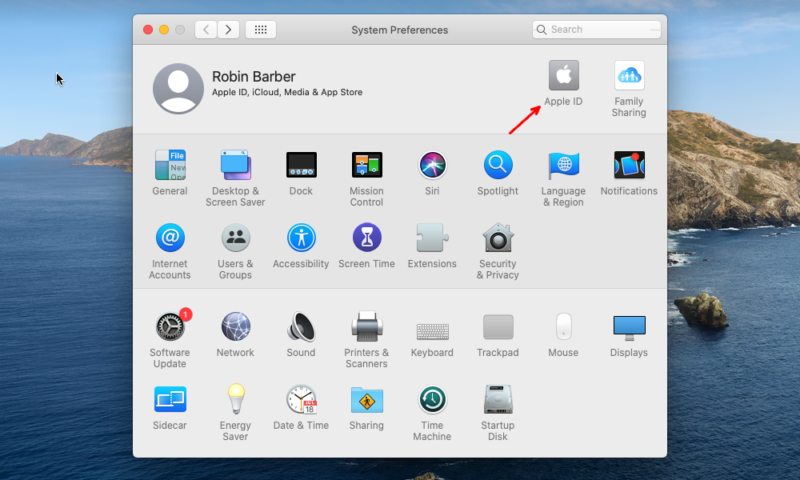
- Go Into Your Apple ID Preferences
Open the system preferences app on your Mac and then click on “Apple ID” in the top-right corner.
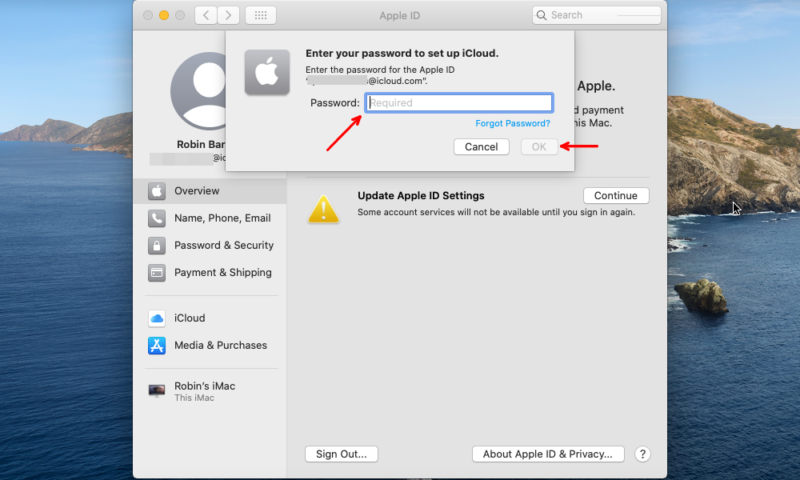
- Sign in to Your iCloud Account
You may need to sign in to your iCloud account here to make changes.
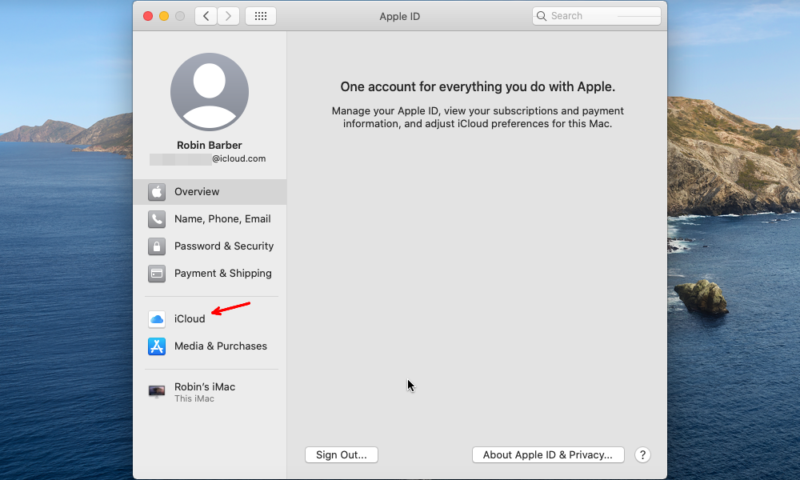
- Select iCloud in the Sidebar
Find and click on “iCloud” in order to open your iCloud preferences.
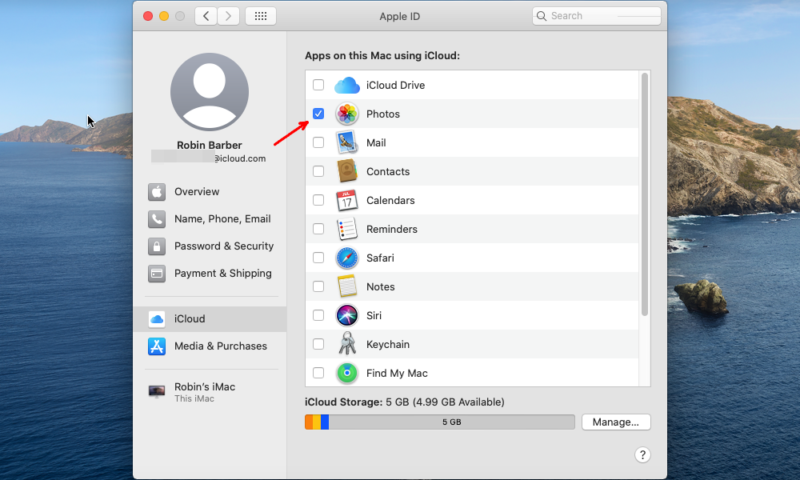
- Turn on iCloud Photos Backup
To start backing up your photos to your iCloud photo library, check the box next to the photos app.
How to Backup Mac Photos to Google Drive
Although it isn’t the easiest option, having the choice of which cloud storage you use is always nice — and there are plenty of great cloud storage services for Mac. Using a provider like Google also makes it easier to share files with your non-Apple devices, such as an Android phone, which are more likely to come with Google Drive preinstalled.
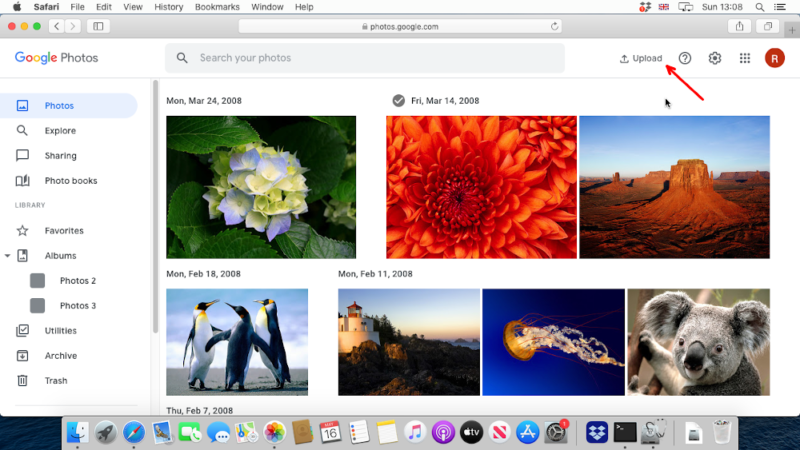
- Sign in to Google Photos and Click Upload
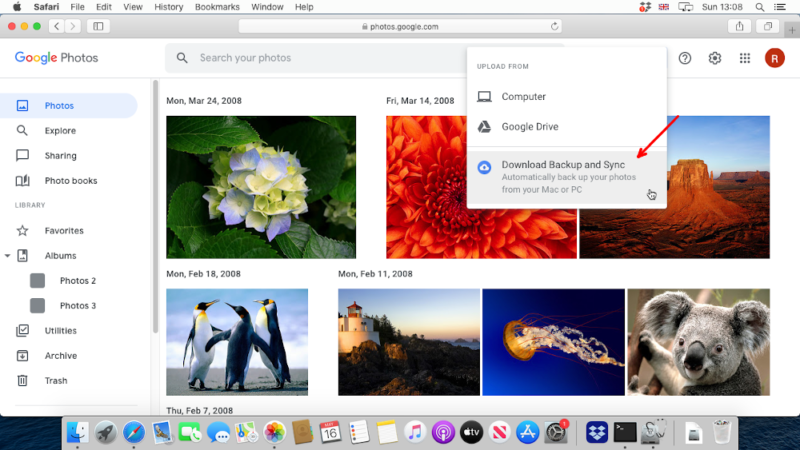
Go to the Google photos page, check that you’re signed in to the right account and click “upload.”
- Choose to Download the Backup and Sync App
In the dropdown menu, you can select “computer” for a one-time upload or “download backup and sync” to keep a live backup.
- Click Download and Allow
When you click “download,” it will ask you to allow downloads from photos.google.com. Accept this to start the download.

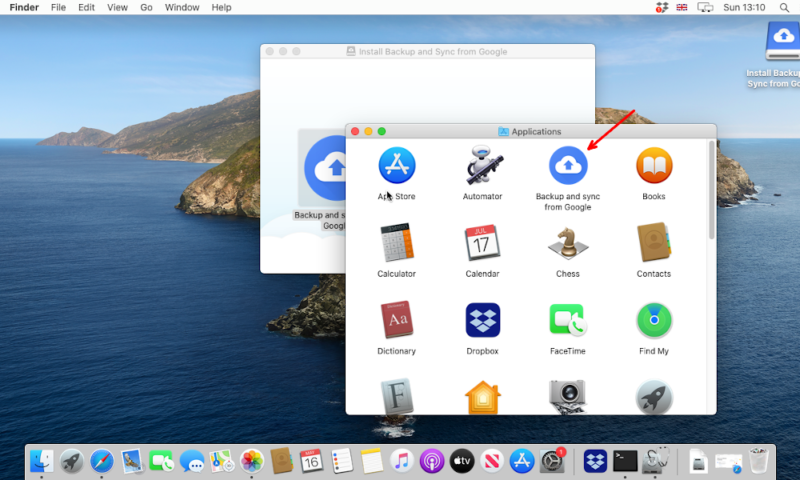
- Open Backup and Sync from Google
Move the “backup and sync from Google” app into your applications folder and install it.
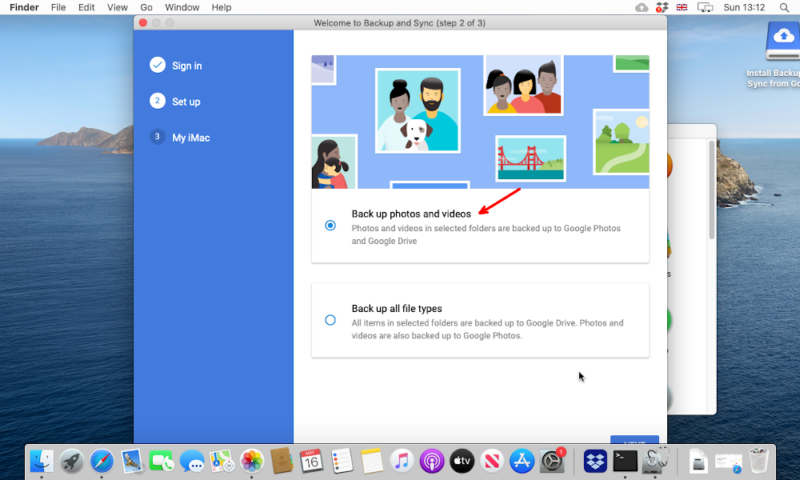
- Choose to Backup Photos and Videos
In the “setup” section, choose to backup your photos and videos.
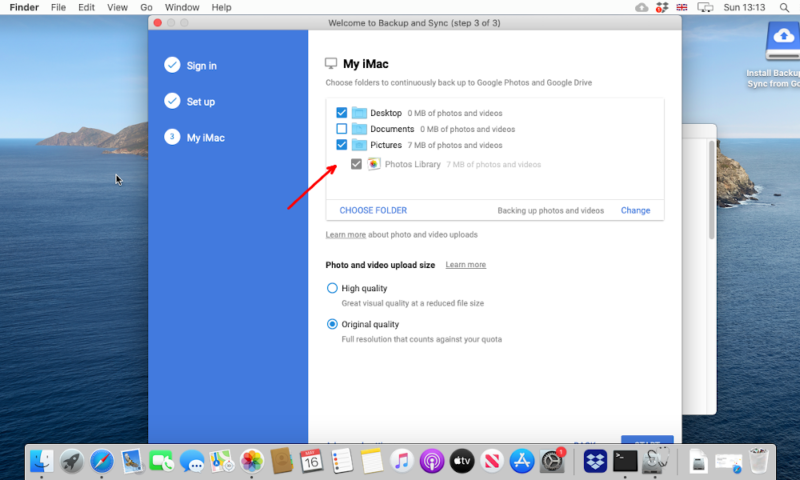
- Select Your Photos Library Folder
In the “my iMac” section, make sure you select both the “pictures” and “photos library” folders, so they have a tick.
How to Backup Mac Photos With Dedicated Backup Software
There are plenty of ways to backup a Mac, including using Apple’s own software Time Machine. However, while Time Machine is great for local backups — as you can read in our full Apple Time Machine review — it doesn’t come with any of the benefits of the cloud.
So, if you want to use an online backup for your Mac, you’ll have to follow this method using a dedicated backup software, like Backblaze.
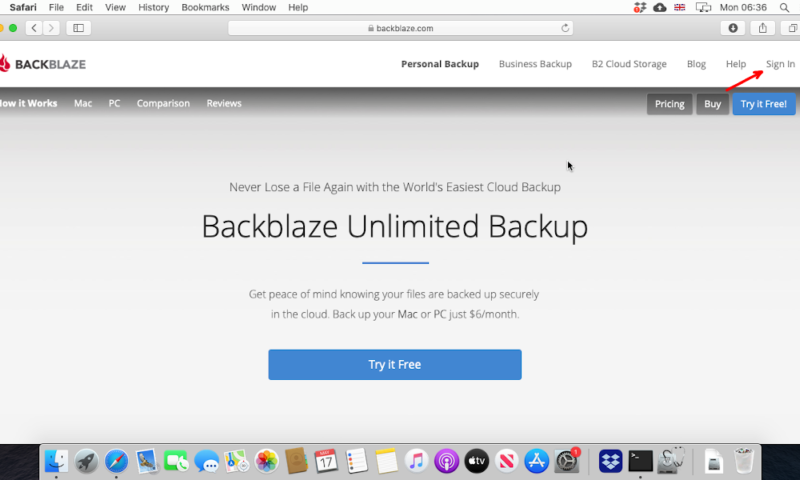
- Sign in to the Backup Service
Go to the backup provider’s website and create a new account or sign in to an existing one.
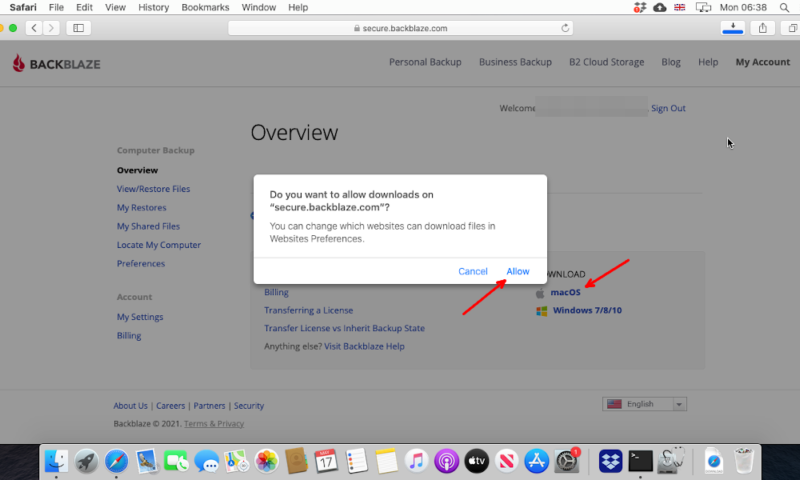
- Download the Backup Software
Find the download button for Mac devices and click on it. Make sure to allow downloads from the page when prompted.
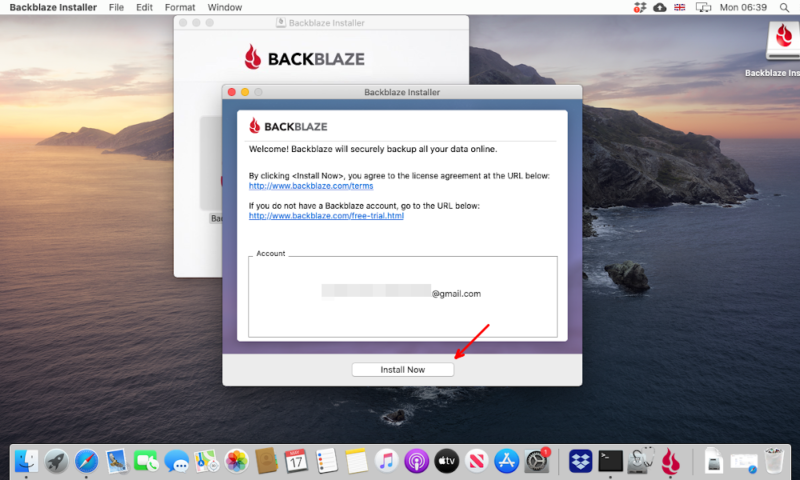
- Install the Backup Software
Once it downloads, open the installer and follow the on-screen prompts.
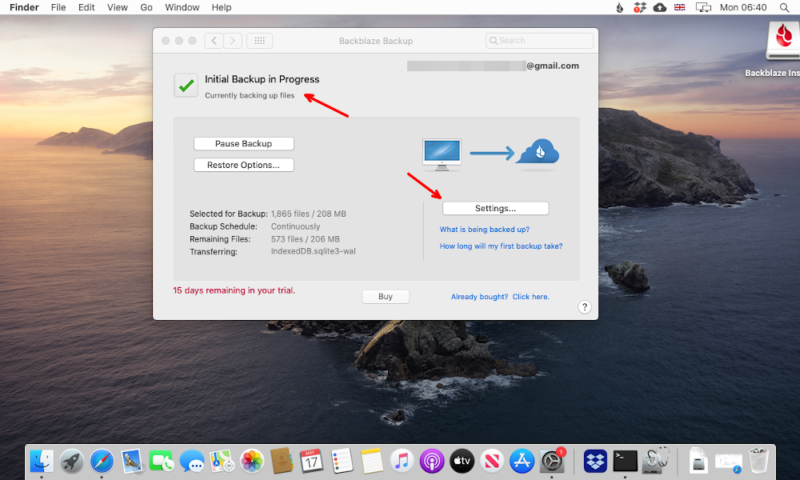
- Check That a Backup Has Started
Open the backup app and check that the initial backup is in progress. You can also go into the settings to set up regular backups and change other preferences.
Final Thoughts: Saving Your Photo Library on Mac
Copying your photo library to an external drive or cloud storage service is a quick and easy way to backup your photos. So, whether you prefer to use iCloud, Time Machine, Google Drive or any other backup provider, like Backblaze, you can keep your images safe from physical and digital harm while still being able to access them at any time.
Once you have moved your photo library to an external drive or cloud storage, you should also consider how you can keep your Mac safe from harm. A good antivirus for Mac can keep your computer safe, even from ransomware and other cybercriminal activity that might threaten your important files.
Do you store lots of photos on your Mac? Have you backed up these images? Did you use one of these four methods? Let us know your thoughts in the comments section below. Thanks for reading.
FAQ
You can backup your photo library to the cloud by turning on iCloud in your system preferences and checking the box next to “photos.”
If you prefer to create backups on local storage, you can simply click and drag pictures from inside the photos app to your external hard drive in finder.
In the photos app, select “photos” and then “preferences.” Here, you can go into “iCloud” and choose to “download originals to this Mac.” This will keep an offline copy of the photos on your device.
To export your photo library, select all the photos you want to export, click “file,” “export” and then “export photos.” A window will appear, giving you options for where in the pictures folder you want to export the files to, as well as the file type you want to use.

