How to Use Dropbox: Tutorial for Beginners in 2025
Dropbox is a market leader in the cloud storage space. That's why it's popular for new users looking to backup their files. While at first glance it may seem difficult to use, it really isn't. But for those still unsure, we're going to show you exactly how to use Dropbox.
Dropbox is a fantastic option for those looking for an easy-to-use, low-cost cloud storage platform. In this beginner’s guide on how to use Dropbox, we’re going to go over its basic functions and simple ways you can start interacting with it across multiple devices.
Although Dropbox’s free version will be enough for some, those who need more storage and features will need to look at the paid options. The paid service is a little more expensive than some of the competition, so you may want to consider alternative services such as Sync.com or OneDrive if you’re trying to keep costs down.
If you want to learn more about how Dropbox works or see how it stacks up to its rivals, check out our Dropbox review. If you’re here to learn how you can get the most out of Dropbox, though, continue reading this guide.
-
09/15/2021 Facts checked
Cloudwards.net updated this article to include current Dropbox pricing, step-by-step instructions and more information about Dropbox features.
-
08/07/2024 Facts checked
We updated the article to include more relevant information on what Dropbox is and its main uses.
-
02/24/2025 Facts checked
We added up-to-date information about Dropbox’s key features.
What Is Dropbox?
Dropbox is a cloud storage service, which is a type of online service that lets you store files online. This can help free up space on your device, back up your files, access them remotely, and even share them with others or collaborate on documents.
Dropbox is free to use for up to 2GB of storage, though you’ll have to pay extra if you need to store more than just a few documents. With cross-platform compatibility across Windows, macOS, Linux, iOS and Android, Dropbox ensures your files are accessible on any device or operating system.
What Is Dropbox Used For?
Dropbox has many uses that it mostly has in common with other cloud storage services. However, it also offers some unique features that are mostly related to productivity, such as document creation and editing, cloud collaboration and note taking, as well as some useful space-saving features. Here are the key uses for Dropbox:
- File backup: People turn to cloud storage to backup their files and to free up space on their hard drives. However, new users should be aware that uploading files to Dropbox doesn’t automatically remove them from your hard drive. If that’s your objective, you’ll need to manually delete the files from your computer after uploading them to the cloud.
- Mobile photo backup: Like most other cloud storage services, Dropbox can automatically back up the photos you take on your mobile phone.
- File syncing & remote access: Dropbox does have automated features that are useful, though. For example, any files uploaded through the desktop app are automatically updated when you make changes to them. Also, because of the synchronization features, you can access those files across all of your devices.
- Disaster prevention & recovery: This system keeps files secure against technical problems you may have with your computer. For instance, if your hard drive fails, your photos and other important documents won’t be lost forever if they’re stored in the cloud. Although you may think your computer is secure, there’s always a small chance it will be damaged, die of its own accord or even get stolen.
- Document editing: Dropbox works with Microsoft Office and Google Workspace. It lets you create and edit documents with either productivity suite, which you can then edit online and even collaborate with other people on.
- Document scanner: Dropbox’s mobile app includes a built-in document scanner so you can capture physical documents, receipts and whiteboards directly into your Dropbox storage. The scanner automatically crops and enhances images for better readability.
- Real-time collaboration: Dropbox Paper integration enables real-time document collaboration, allowing teams to create, edit and comment on shared documents directly within Dropbox. Unlike basic file sharing, Paper provides rich formatting, commenting and task management features all within a single collaborative workspace.
- AI search tool: Dropbox Dash is an AI-powered universal search tool that helps you find content across all your connected apps and cloud storage. It can analyze your content to find answers to questions and summarize key findings from your documents, making it easier to locate and work with your files.
Using Dropbox for File Management Sharing
All files uploaded to Dropbox can be downloaded to a different or new device, including mobile and desktop. This makes it much easier to get set up on a different system, especially if you’re starting from scratch due to a malfunction on your previous device.
Dropbox has excellent functionality when it comes to sharing files. Getting your files to others is simple via shareable links and a range of user permissions. Permitted users can also comment and offer suggestions on files including documents, photos and videos.
You can use Dropbox as pure cloud storage, too. As long as you use the web client, you can add files to your Dropbox account and store them only in the cloud. (We have a guide in case you run into trouble with Dropbox not syncing.)
How to use Dropbox for Free: Pricing & Account Tiers
You can use Dropbox for free by signing up for a Basic account on its website. Basic only comes with 2GB of free storage, which is enough if you don’t intend to upload many files. We’ll discuss the sign-up process in the next section.
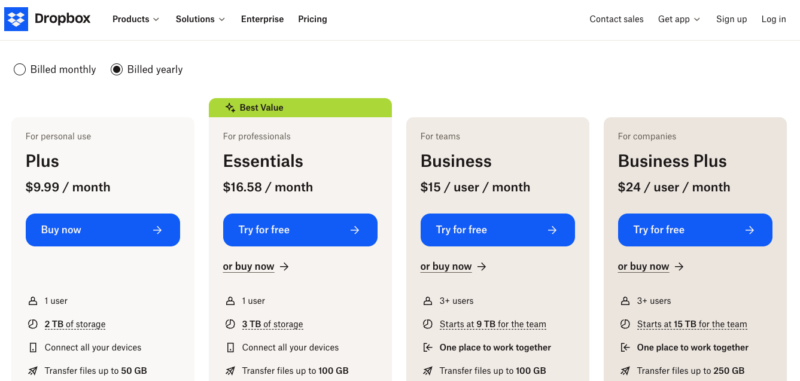
Dropbox has multiple paid options for personal accounts. Unsurprisingly, the higher the monthly fee, the more storage and features you can access.
The Plus plan costs $119.88 (one-year plan), which works out to $9.99 per month (if you prefer to pay monthly, the cost is $11.99 per month). With that you get access to 2TB of storage space. You also get access to features lacking in the free plan, such as smart sync, mobile offline folders and account rewind (to recover accidentally changed or deleted files).
For 3TB of storage, you can upgrade to the Essentials. The annual total for this plan is $199 ($16.58 per month) and it comes with features like file versioning and expiration dates for shared links.
How to Use Dropbox Smart Sync
Another big difference between the free and paid Dropbox plans is that the latter unlocks “smart sync” (read our what is Dropbox Smart Sync? piece).
To briefly explain, smart sync allows you to mark files you create on your desktop as “online only.” You can access and edit them anytime you use your computer, but they won’t be stored locally unless you choose to download them.
In addition, smart sync now automatically moves files you haven’t accessed recently to online-only storage, helping you save hard drive space without any manual intervention. You can still see all your files in File Explorer or Finder, but they won’t take up local storage until you need them.
Smart sync also includes bandwidth management features that allow you to control upload and download speeds to optimize performance based on your internet connection.
Without the smart sync feature, users don’t have the option to store files solely in the cloud. If you have plenty of internal storage space, this likely won’t be an issue. For those who constantly max out their local storage space, paying more to access the smart sync feature will be money well spent.
Aside from smart sync, Dropbox also offers selective sync, which lets you choose specific folders to sync locally, helping manage storage space while maintaining cloud backup of all files.
How to Sign Up for a Dropbox Account
To begin using Dropbox, you’ll first need to create an account. Thankfully, it only takes a couple of minutes to do, and you can follow the steps below to get started.
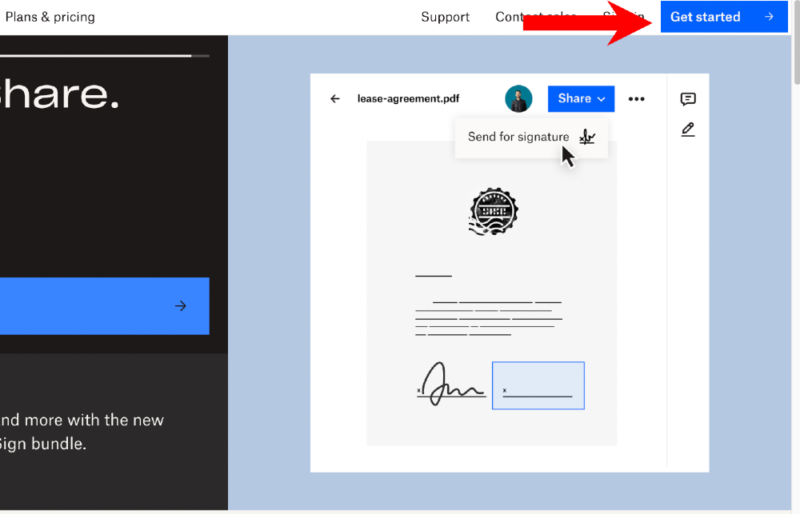
- Locate the “Sign in” Prompt on the Website
Once you have reached the Dropbox website, select “sign in” in the top right-hand corner.
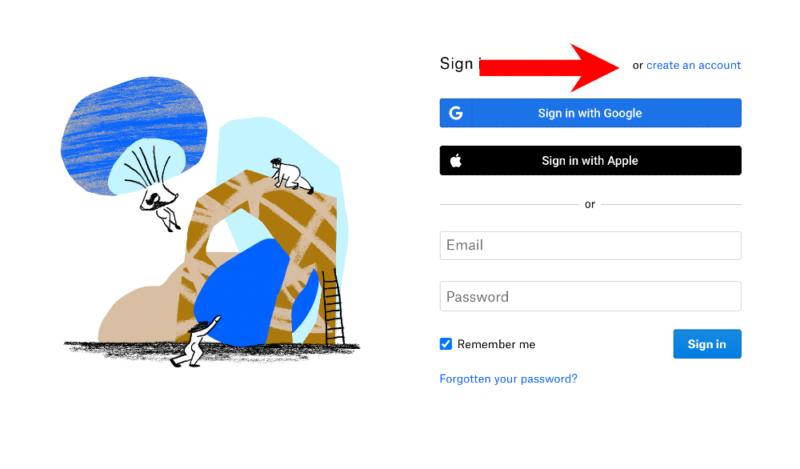
- Select “Create an Account”
To create a new account, select the “create an account” option.
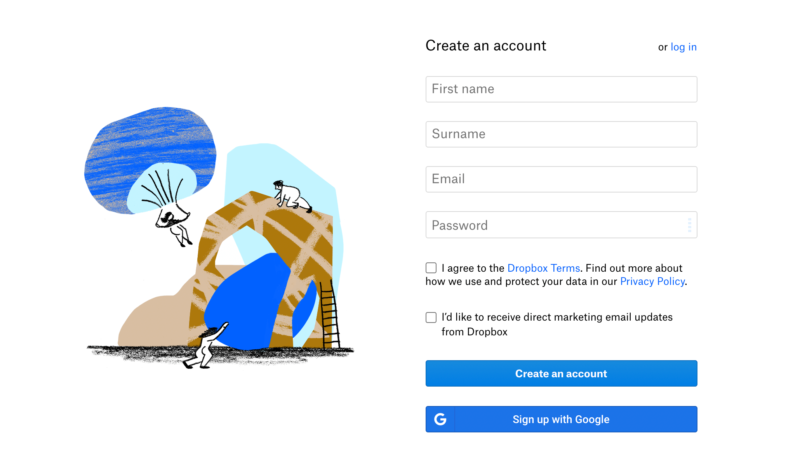
- Enter Your Personal Details
You’ll be prompted to enter your name, email address and password. (If you want to keep your passwords secure, check out our pick of the best password managers available.) For a slightly quicker process, you can also sign up to Dropbox using your Google account.
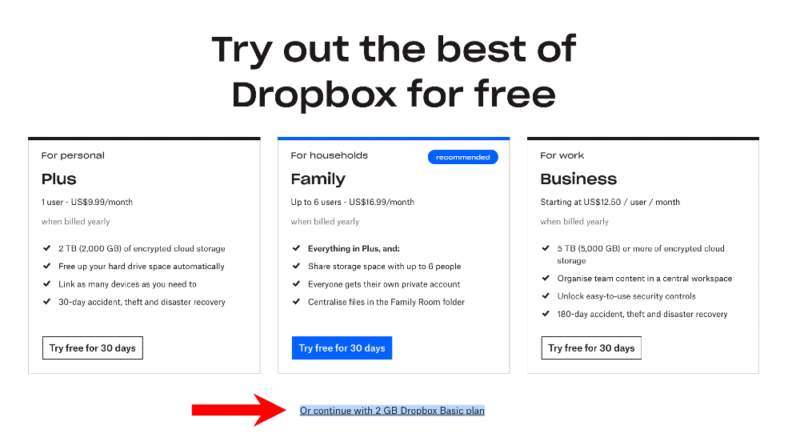
- Select Your Plan
On the next page, you will be asked to select the plan you would like to use. If you prefer to stick to the free plan, select the option “or continue with 2GB Dropbox Basic plan” located at the bottom of the screen.
Dropbox will send you email confirmation of your account. You will need to verify your email address before you can use the service.
Once the sign-up process is complete, you will be prompted to download Dropbox to your computer. It’s a good idea to do this if you want to automatically sync files from your computer to the service.
To better protect your Dropbox account, it’s recommended to enable two-factor authentication after signing up. This adds an extra layer of security by requiring both your password and a verification code to be sent to your phone when logging in from a new device.
For additional security, Dropbox Passwords will allow you to share login credentials and payment card details with other users. This built-in password manager automatically syncs across all your devices and helps you maintain secure access to your accounts.
How to Use the Dropbox Folder on Mac or PC
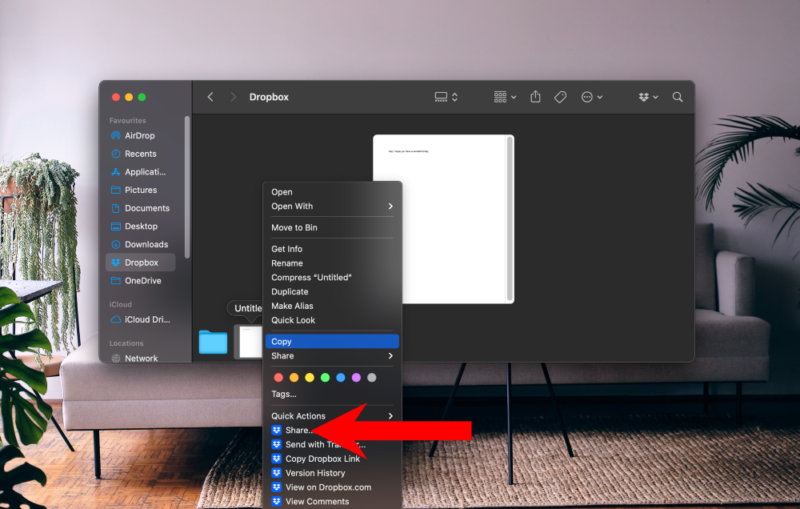
Downloading Dropbox to your desktop automatically creates a Dropbox folder. The desktop app integration adds context menu options to your file explorer, letting you quickly share, view version history or copy Dropbox links directly from your computer’s interface. You can use the steps below to sync files to this folder.
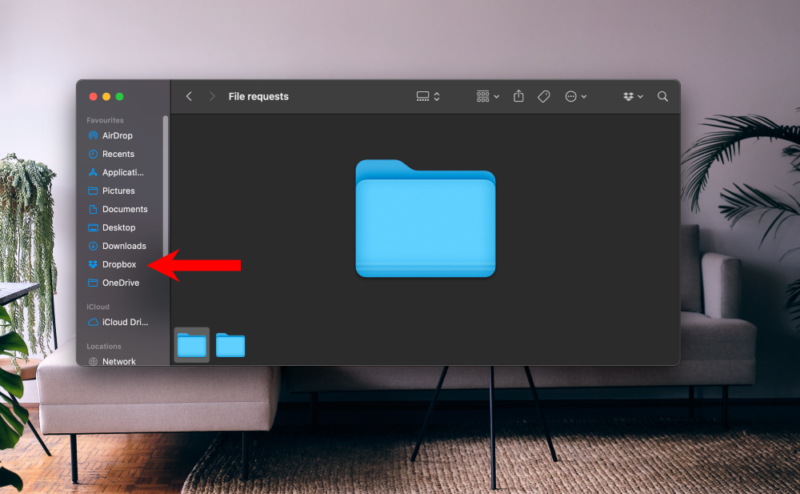
- Locate the Dropbox Folder
Open “finder” and locate “Dropbox” in your “favorites” tray.
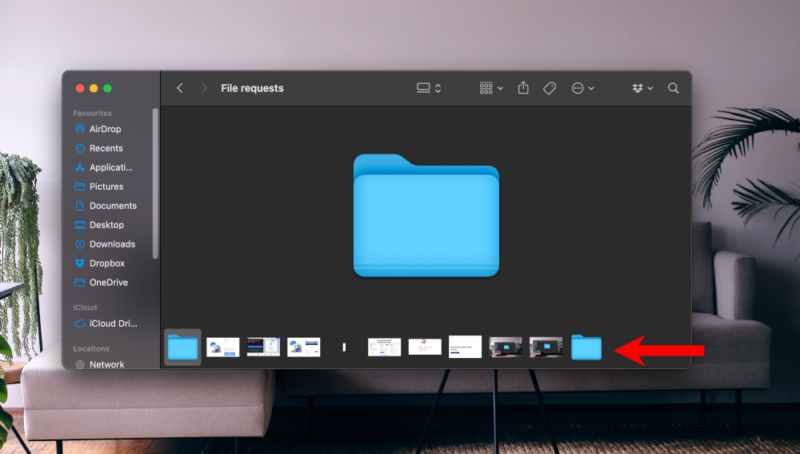
- Drag and Drop Files Into Your Folder
To add files, simply drag and drop them into your Dropbox folder. All files added will be synced to your Dropbox account and you will be able to access them across multiple devices.
- Save Files to Your Dropbox Folder
When saving a file, you can choose to save it directly in your Dropbox folder. All files saved to Dropbox will automatically sync to your account.
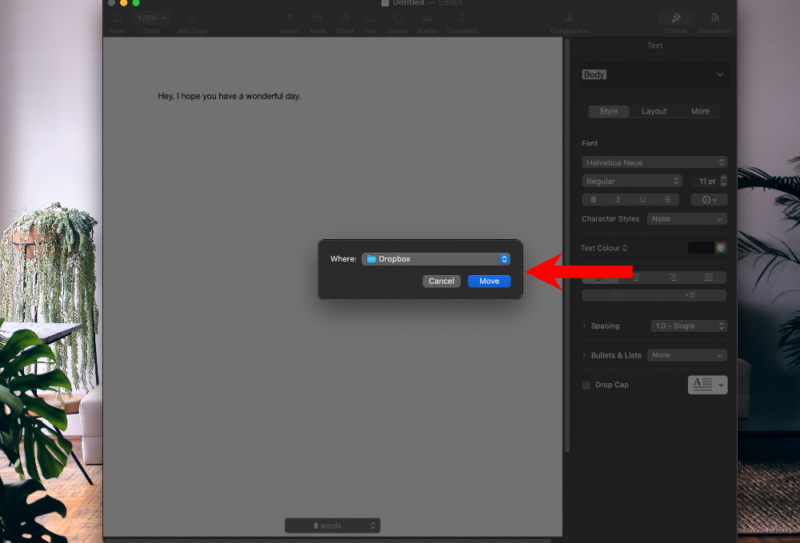
Another good thing to note is that Dropbox Backup provides automatic protection for your computer’s important folders like Desktop, Documents and Downloads. You can also back up external hard drives directly to the cloud, ensuring your files are safe even if your hardware fails.
How to Use Dropbox on Web
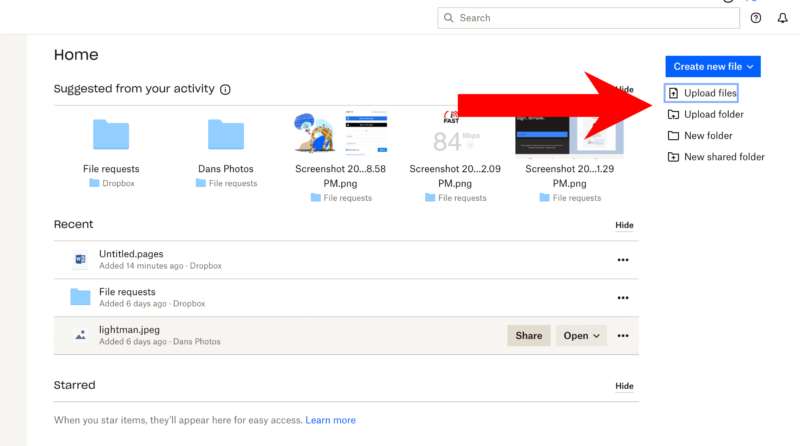
If you prefer not to download Dropbox to your computer, you can upload files directly through the web application. It’s easy to do; just follow the instructions below to begin backing up your files.
How to Upload Files to Dropbox
The first thing you’ll want to do with Dropbox is upload some files.
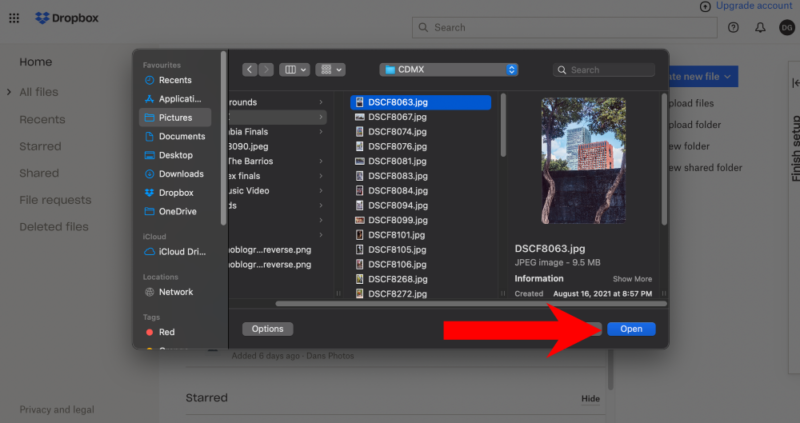
- Select the File
Select the file you want to upload and tap “open.” The file will be uploaded to your Dropbox account. You can follow the same process to upload a folder.
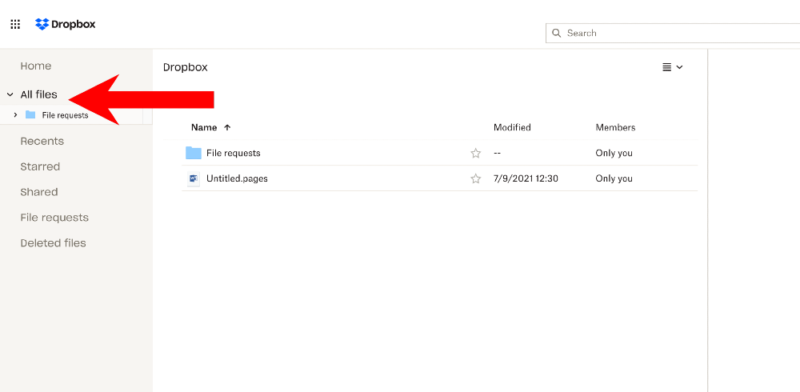
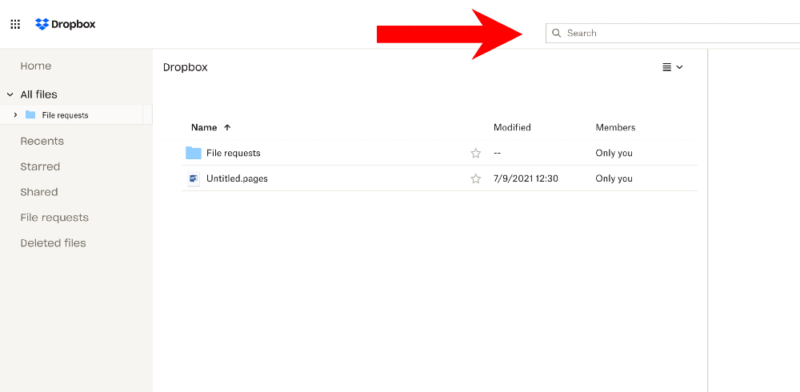
How to Navigate Files Using Dropbox
Finding files on the web application is straightforward and takes no time at all. Dropbox’s advanced search function helps you quickly locate files by searching not just file names but also file content, including text in images through OCR technology. You can further refine searches using filters like file type, date modified and shared status.
How to Use Dropbox to Share Files
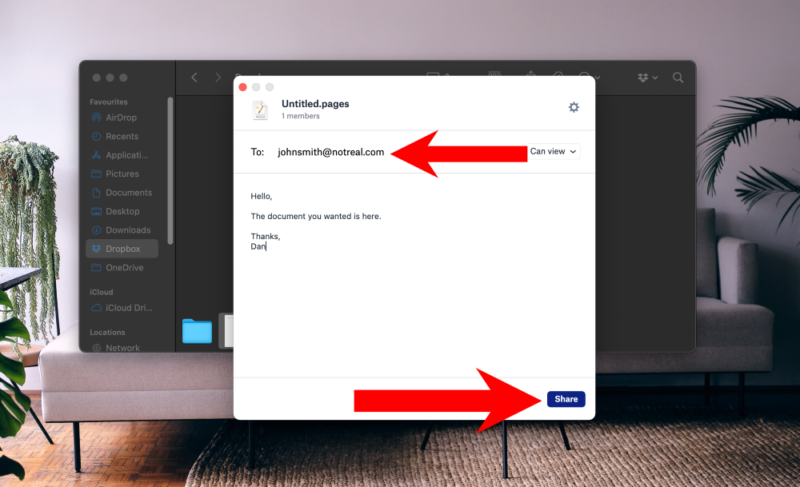
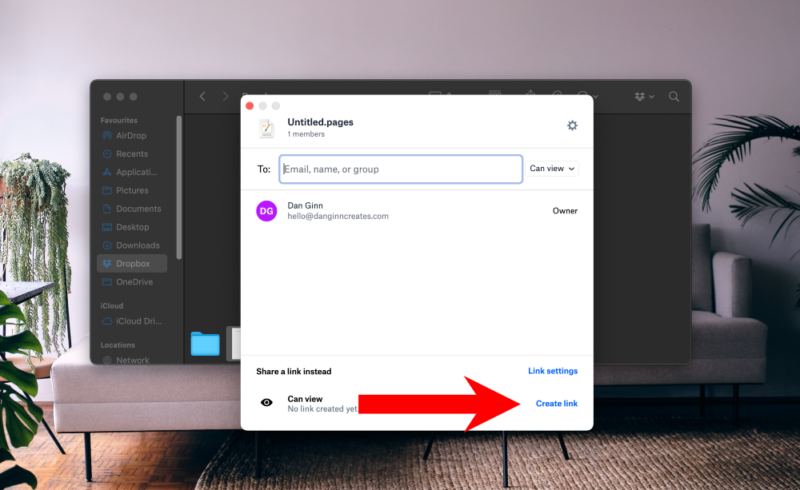
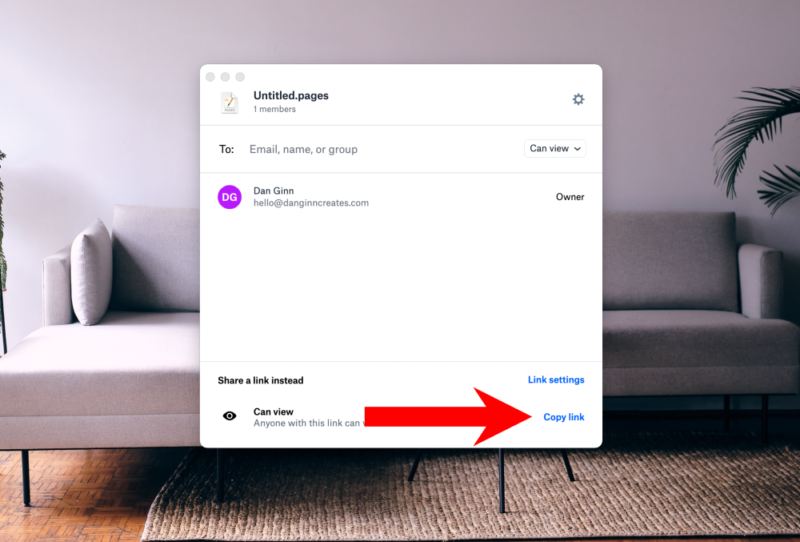
There are multiple ways to share a file or folder through Dropbox. Team administrators can even use administrative controls to manage sharing permissions, monitor file activity and enforce security policies across the organization.
With Dropbox Replay, you can streamline video review processes by adding frame-accurate comments, conducting live review sessions and managing feedback from multiple reviewers in one place. This makes it easier to collaborate on video projects without lengthy email chains.
There’s also a creative tools add-on that allows users to transfer files up to 250GB (increased from 100GB), making it easier to share large media files and creative projects with clients and collaborators.
Below is a brief overview of what you need to do to share a file from your computer. If you want a detailed look, check out our guide on how to share files with Dropbox.
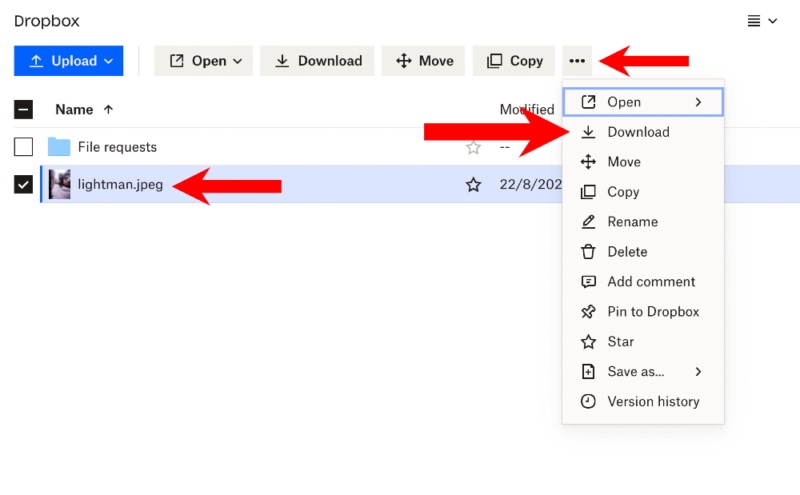
Use Dropbox to Download Files
Let’s say that you’re on a new device and you need access to a file you saved to Dropbox, but you don’t have the service installed and don’t want to install it. Instead, your option is to log in via your browser and navigate to the file you want to download.
Use Dropbox to Restore Files
If you accidentally delete a file or folder, fear not: Dropbox’s file version history feature lets you track and view changes, and restore any previous version of a document from the last 30 days (or 180 days for Professional plans). Here’s what you can do to recover your files.
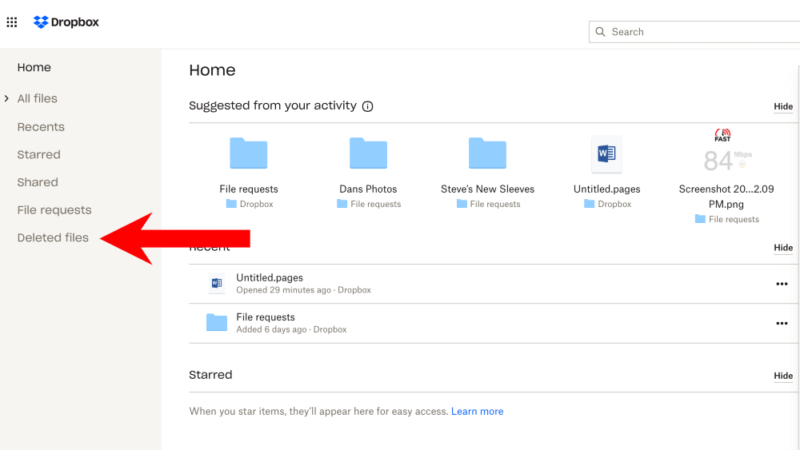
- Locate Deleted Files
On the left-hand side of the home screen in the web application, you will find “deleted files.” Select it to move forward.
- Select the File You Want to Restore
Select the file you would like to restore and press “restore” on the right-hand side of the screen.
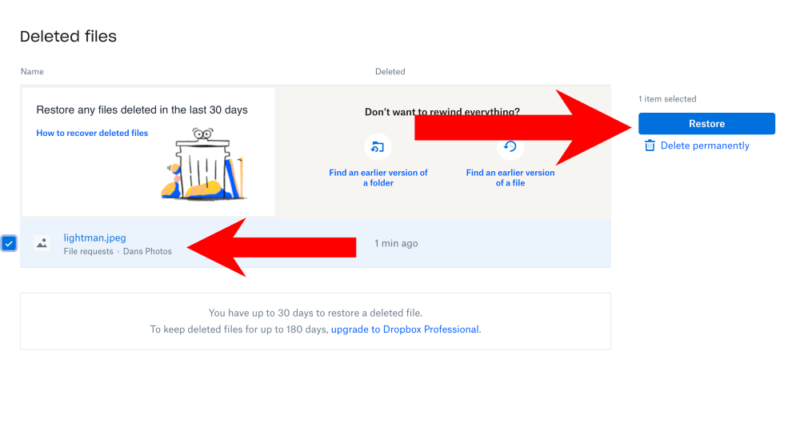
If you would rather delete the file completely, select “delete permanently,” located underneath the “restore” button.
Use Dropbox to Request Files
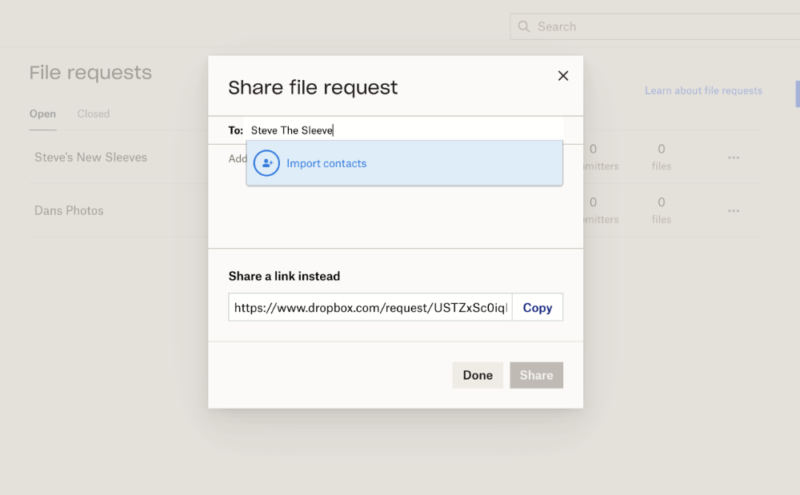
The “file request” feature allow you to invite people who don’t have a Dropbox account to securely upload files to yours via custom upload links. You may find that useful when you need to get files from employees or relatives who don’t use the platform. It’s also a good way for teachers to collect files from students.
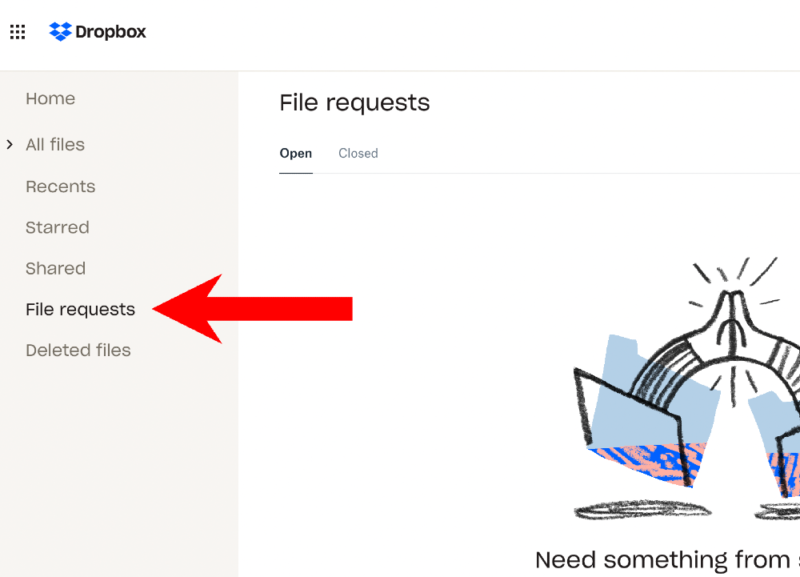
- Log in and Locate “File Requests”
To request a file, log in to your online Dropbox account. On the left-hand side, you’ll see “file requests.” Click on it to move to the next page.
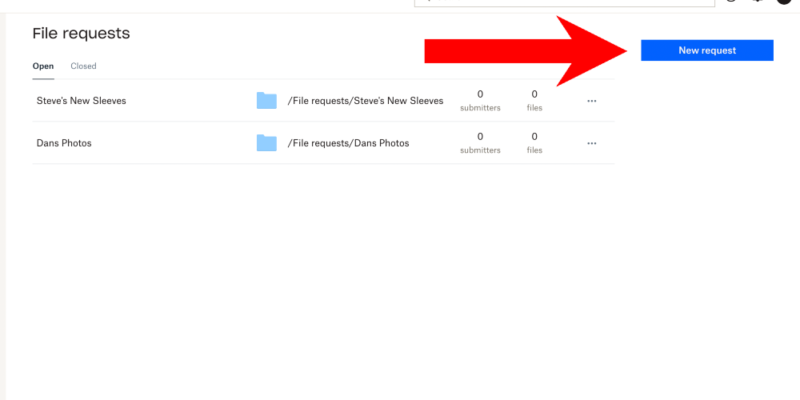
- Select “New Request”
Next, select “new request” on the right-hand side of the screen.
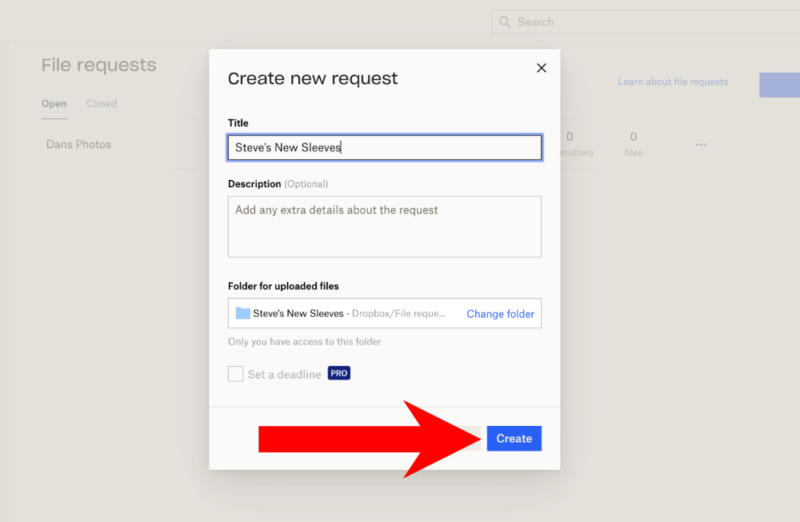
- Name the Folder and Add a Description
On the next page, you’ll be asked to name the files you’re requesting. For example, you could call them “birthday photos” or “tax documents.” Once you’ve decided on a name, choose the folder you want Dropbox to put them in. Tap “create” to move forward.
Final Thoughts
Uploading files to Dropbox means you don’t need to worry about losing them if your computer breaks down. On top of that, it’s a great platform for sharing files and creating new documents. Its sync features also make it a solid option for those wanting to access their files across all their devices.
If you’ve signed up for Dropbox and realized it’s not for you, check out our guides on how to cancel the service, how to delete your account, or how to remove Dropbox from Mac without deleting files.
Hopefully, this Dropbox tutorial helped you better understand its features and taught you how to use them. If you’re still looking for the cloud-based backup service that is right for you, check out our best online backup guide.
Did you find this guide helpful? Do you feel Dropbox is the best option for you? We’d love to know. Let us know in the comment section below. Thanks for reading.
FAQ: How Does Dropbox Work?
Beginners can sign up for a free Dropbox account to see if the platform is right for them. You can refer to this beginner guide to get started, and sign up for a paid plan should you need more storage.
Dropbox is a cloud storage service that allows you to backup and sync your files across multiple devices. After uploading your files to the platform, Dropbox stores them on its servers. You can access these files on any device simply by logging in to your account.
You can easily drag and drop files into the Dropbox folder on your desktop to begin backing them up. If you prefer to use the web version, you can select “upload” and manually choose the files you want to keep in the cloud.


